What is the place of Papert’s “microworld” of Logo in this era of programming, coding and making?

mindstorms bookOk, let’s spare the suspense here. Yes, I think Logo has a place as a valuable programming language with primary and even intermediate learners today. Papert’s Mindstorms book has had a tremendous influence on my thinking and I must admit to being profoundly impressed since it was written and researched in 1980(!) In this book, Papert explores the potential of “world building” through a computer language that he and his team created called Logo aimed at “world-builders” AKA all learners and explorers.  The digital turtle serves as a learning tool manipulated and programmed by students using specific rules in the Logo environment. As learners manipulate the turtle in creative ways, they are in the act of constructing a world of their own. As a Computer Science teacher in 2015, I wonder what is the place of Logo on teaching and learning in this era of creating, coding, making and of course programming?

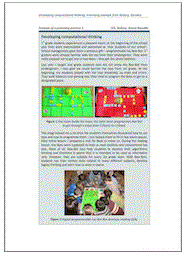
In specific, I have been revisiting Papert and his team’s “microworld” of Logo with primary learners using Microworlds Junior. I must admit that the majority of my attention and Computer Science lessons with primary and junior students have been focused on Scratch and Blockly through the code.org site. However, Microworlds Junior especially has been an excellent gateway tool for programming, drawing and digital tinkering for learners in Grade One to Three. When evaluating their projects, I asked our creator to consider the perspective someone “playing” their file using three questions. Is it clear what to do? Is it fun? Can I replay? These questions provided tools for self and peer evaluation and potential next steps although they are certainly not the only criteria for success. In below pictures and videos, students had the choice to create an animation, story or game on a topic of their choice.

This slideshow requires JavaScript.

More sample videos using the new Microsoft Sway software.  https://sway.com/s/BGlbiBqM0x8cASfZ/embed 

Here are a few strategies that I hope are inspired by Papert’s research and demonstrate good pedagogy for encouraging creativity, design thinking and help prepare primary learners for more advanced programming skills.

1. Demonstrations are very powerful: Get the turtle moving (forward 10+repeat) on screen and ask simply what should the turtle do next, what would happen if two turtles collided? Answers from students included “turn, dance, turn into a ballerina, explode(!), says “I’m cool” etc.) I found it fascinating to try help make their ideas, no, matter how crazy, work. Finding a way to incorporate their creative ideas using the rules of the MicroWorlds Jr. (pendown, multple pages, if then commands etc.) become an amazing challenge for them (and me as an instructor!)

My hope is that this model of experimentation which encourage learners in our class to adopt a similar approach…

2. Avoid teaching a recipe. “Now we going to get the turtle to draw a square” Instead of show them turtle art websites designed by others and ask them which one they like best (or invite them to re-mix the the program or others or create their own design)

3. Celebrate their achievements: I use my SMARTboard to showcase their progress, constantly video recorded their programs using a camera, iPad, Surface and smartphone (I kept running out of space quicker than I could say “upload to GDrive, Dropbox, OneDrive etc.”)   OR create sites like this one Turtle Art site.

4. Encourage failure as an opportunity – F.A.I.L. is simply the First Attempt In Learning or put another way “We are only working with current best idea.” which I attribute to Heidi Siwak from the #bit14 conference last year.

5. Allow collaboration. I let them help and teach each other so the class is a busy and active one.

What cannot happen is that Logo (or other programming tools) should be used to explore traditional teacher-led pedagogy. If Logo is taught as “content” then I think is loses it potential as an amazing “playground” or “sandbox” for digital play, program creation and innovation.


For further reading on the ideas of Seymour Papert, Logo and Programming…

Check out Jim Cash’s excellent post (backed up by much academic research too!) critically examining the work of Papert in the context of the recent increased interest in the coding and making movement.

and the work of Peter Skillen as a fun and experienced advocate of Logo and the work of Papert.


Here are a few sample teaching slides I assembled for classes.

This slideshow requires JavaScript.


Here is the link to MicroWorlds Junior site.

Finally let’s end with…

Gary Stager’s excellent TED Talk on Seymour Papert” Inventor of Everything!

Our Hour of Code ’14 and Computer Science Week

The Hour of Code is a great way to encourage computational thinking and Computer Science for learners of all ages. This year’s Hour of Code was only possible thanks to a great team of colleagues and students who made it so much fun (and busy!) On the week of December 8th to the 12th, we implemented a school-wide initiative with students participating from three divisions K-5, Grade 6-8 along with our Grade 9-12 programmers taking the lead. Our goals were to encourage students to use computer technology as a creative programmable tool and prepare them for the programmable times that we live in today and tomorrow. (I like this Wired article by: Bill Wasik!) Needless to say, this was a popular event as almost all primary and junior students, when given encouragement and support, love using technology and for some this opened up new possibilities of learning, expression, creativity and sharing on devices familiar to them.

Some of our events and highlights included:

1. Our Hour of Code led by our Grade 11 and 12 programming students who partnered with our Grade 3 coders to explore apps such as Scratch, Lightbot and the code.org tutorials. Having Scratch 1.4 as a backup proved invaluable when connectivity was slow or unavailable to the code.org site. (This happened as our Hour was the first Monday of Comp. Sci. week at 9:00am!)

2. All our K- 8 students completed their Hour of Code on a variety of programming and coding applications during ICT classes. Students from SK and up explored Lightbot, Scratch (Why write a holiday card when you can create a holiday code?), and the multitude of programming activities at code.org. Outside of classes, students were lined up the door to get a seat at our lab computers to complete our coding activities. (Enough to bring a tear to this Computer teacher’s eye…although no time for that, too busy helping and encouraging 😉

2. Competition  – After much discussion prompted by exploring the videos on the need for Computer Science in the K-12 curriculum, students were encouraged to create a program using Scratch. Some excellent ideas…Link
scratc2

3. We met and partnered with a local Computer Scientist, entrepreneur and CEO who supported our efforts and told us the journey of her career in Computer Science and some of her successes, challenges and adaptations to the always changing (and always exciting) field.

4. We also presented at Assembly including the famous Loop Dance and a popular visit from Sphero (so much buzz, I think I might have sold a few and or had the Sphero added to student’s lists for Santa…:)
loop1

5. Most importantly, our programmers from Grade 3 and up went beyond One Hour of Code and were keen to continue their programming journey through the code.org site especially when they could login and save their progress using their school Google accounts.

By my very, very rough estimate, I would say approximately over 10,000 lines of code were written over the week. Here is a link to my simple Scratch program and presentation at assembly!
scratch1

Probably, my favourite takeaway from this event was that we encouraged all, including our teachers that students can create and curate computer programs (like visual-based code like Scratch or text-based code) to demonstrate their learning and understanding in any topic. Learn to program or program to learns(?)…how about both!

Reflecting on my first MOOC – ICT and Primary – University of London & Coursea

Screen shot title

In June, I enrolled in my first MOOC (Massive Open Online Course) and I am pleased to say that I completed all six weeks earning a certificate (with distinction no less!) in this self-directed learning opportunity. Here’s why?  Well, basically, the stars aligned for completing this MOOC for me: as the topic mirrored my everyday professional role as an ICT specialist, MOOC’s  were a recent area of discussion in my latest graduate course and probably the main reason, June means the end of term here in Canada so with some of my own children off to camp I actually had some time to spend on it. And boy was it worth it…

Here are top 5 takeaways from the course. (A link to my full course journal is at the bottom of the page.)

1. ICT provides much opportunity for student learning.

Dr. Laurillard suggests in her book Teaching as a Design Science (Laurillard 2012) that ICT provides learning types or opportunities in the following categories (acquisition, discussion, investigation, practice, collaboration & production.) This model will be helpful for me and my PLN for future lesson planning, collaborations and discussions on technology integration. In the course, there was considerable emphasis on a student’s ability to learn, play and create as a core foundation which resonated with me. Although technology skills are increasingly proving vital for student pursuing academic studies and eventually finding employment, the emphasis of the integration of technology should be primarily focused on creating the best learning opportunity for students.

2. Much can be learned from exploring globally how primary schools integrate technology. 

As teachers we are always so focused on our own schools and students (pupils) that the opportunity to peek through classroom walls (and schools), hear directly from leaders and review specific case studies was a powerful learning opportunity in this MOOC. In particular, a school in Singapore had an excellent 1:1 model which comprehensively involved all members of their learning community. I also liked the emphasis on ICT in UK primary schools away from traditional ICT skills like word processing  towards an updated curriculum emphasizing computational thinking and creative tinkering using technology. Robot arms, Beebots, Probots and other educational programming. Yes, please… In fact, one of the assignments was to make a technology decision for your school, my proposed suggestion was to add more computational thinking opportunities through apps like Scratch Jr., Kodable, Cargo Bot, Hopscotch, Move the Turtle and Daisy the Dinosaur and hardware like Beebots, Probots and Lego We-Do and Mindstorms.

3. I reaffirmed the importance of Computational Thinking and its place in the primary curriculum.

(OK from my blog, you probably figured that I was sold on this one but there are so many interesting resources that I plan to champion in school.)
Here are a few computational thinking resources that I explored in the course.

Developing Computational Thinking. Some interesting ideas and resources from Bosany, Slovakia. Their exploratory approach of Beebots with primary students was helpful and definitely worth adopting.

comp1

National curriculum in England: Computing at Key Stage 1 and 2 Wrote about this in my presentation on Scratch at last year’s ECCO conference but the UK is making some bold moves in updating its curriculum to promote programming which is quite commendable.
national curriculum uk2

Computational thinking video by ISTE

In specific to my experience, I would love to implement Beebots, computational programming apps for primary students like Scratch Jr., Scratch among others  and extend use of programmable Lego like We-Do and Mindstorms. This should make for an exciting year.

4. Collaboration and teacher support is vital for the successful integration of technology.

6.1.1 sarah hill image
This theme was echoed in forums, discussions and projects throughout the course. In one part of course, an Australian ICT teacher named Sarah Hill worked side-by-side with teachers at all stages of integrated projects, starting with an initial professional training and development session, followed by collaboration and team teaching when necessary. Although not mentioned in this specific video,  the need for reflection and evaluation after integrated projects is critical but often overlooked in the hustle and bustle of the busy classroom and lives of teachers. I try to emulate this practice in my collaborations with teachers emphasizing support and student needs over any of my technology preferences. Other resources explored in the course include Learning Designer, Diigo and Twitter as excellent online tools for teachers to connect and share resources for the successful integration of technology. Increasingly the creation of a online and growing PLN both inside and outside the school is a helpful strategy for teachers.

5. Children love learning with technology. (I can echo this from over 15+ years as an educator and as a parent of two primary digital tinkerers!)

I believe children see technology as “their” medium with so many opportunities for them to explore and create. Even traditional subjects are more motivating when explored through technology. Here is a research paper from UNESCO on the perspective of children.

Read Chapter 7 ‘Students’ perspective’, of the UNESCO Book ICT in Primary Education. Volume 2: Policy, Practices and Recommendations.

Here is a link to a Padlet with some drawing, pictures and perspectives shared by teachers in the course.
‘Children’s Voices’ Padlet Wall: http://padlet.com/wall/wbarmwiy24


My #summerofpd continues, next up, a more “MOOCy” madness for me. I have signed up for a fun MOOC on the history of  Beatles (Bring on the (pub) quizzes!?) and on a more professional note off to get my Google certification… (More tests !?)

Here is a link to my Course Journal from my Academic research tab.

~Anthony

New – web based learning tool on creating new learning environments with the Microsoft Surface Pro

Feel like ALL the tablet guides on the internet are about the iPad ONLY. Me too! The iPad is great as a learning tool but definitely does have some limitations. Hello Flash! Exploring this web based learning tool encourages educators explore the benefits of a Windows-based tablet (I use the Microsoft Surface Pro 2.)  as a full laptop replacement.
http://surfaceandbeyond.wordpress.com

This tool explores…

1. Using the Microsoft Surface.
2. Why Tablets? What Surface?
3. Creating a vision for use
4. Resources for communicating that vision  
5. New pedagogies and approaches to learning.
5. Implementation resources (i.e. carts, 1:1, posters, handouts, lesson ideas.)
6. Next steps with tablets.

Thanks in advance for your ideas. Join the conversation!
Click below to begin.

title

The Surface and Beyond: implementing the Surface Pro 2 with Junior students: Part 3 – Implementation

Ok, so now comes the fun part (i.e. less talk more action!)  where we actually put the devices in the hands of our students. We have created a vision, planned and collaborated and communicated as professionals, set up routines for support among other steps outlined in prior posts. In fact, in the meeting prior to this stage, I got the impression that all the teachers were ready to get going. I shared this feeling too and but felt it was a good sign that the communicate stage (from the Common Sense Media site) had been comprehensive enough and they were ready to have a go with this disruptive yet exciting technology in the class. In truth though, this communicate stage does not stop ever but shifts some of the conversation from planning to implementing and then reflecting on the learning opportunities for students. In other words, back to business as usual (plan, teach, reflect) but with an added technology platform available anytime or anywhere or any size of learning tasks.

In specific, our Grade Three-Five classes had access to three carts bookable through shared calendars in Outlook and we planned a few initial lessons and pilot projects for each grade.

Below are a few resources I used with students during the first lessons. We started by discussing rules, strategies and routines for the new devices on the classroom. Students had already signed an Acceptable Use Policy (AUP) at the beginning of the year. Next year, the tablet implementation and AUP can go hand in hand in our September rollout. However, this third term rollout was great for a trial run and a short turnaround before we reflect upon the experience and start a entire year with these devices at our disposal.

This slideshow requires JavaScript.

I focused on the opportunities for learning that these devices provided and invited students to earn their “Surface licence” through a checklist of activities. I adapted this routine from Suzie Brooks’ excellent GradeThree blog which outlined her iPadding rules and I also drew inspiration from activities teaching in the early days of the internet where students had to earn their “internet driver’s licence” to go online. (These days students earn that “licence” really early at home with all the devices available to them!) However, the idea of the licence is a good one in a classroom as it acknowledges that using the device effectively is a learned skill (i.e. like driving ) and students need to protect themselves and others while engaging in rich learning experiences.

Here is a copy of the Power Point slides I used with our Grade 3 students.

I also provided a few posters along with the Surface Rules and their signed licences and asked if teachers could find a place for them in the classroom. I felt that these could be references by teachers and students if and when needed. All these posters are found from the Common Sense Media site.

After this lesson, the classes were off and running; creating and sharing a variety of pilot projects. In Grade 3, students were adapting their “Hamburger” writing into a recorded slideshow format for sharing. (“Hamburger” writing is of course the introductory and conclusion sentences as the buns plus 3 juicy facts of research in the center of the burger but you knew that 🙂 In Grade 4, the students were researching Ancient Civilizations using collaborative Popplets as a graphic organizers and the Google Slides as their final presentation tool.  Grade 5 students were creating a Grecian Urn and completed sketches on an app called Fresh Paint, researched a report about Grecian Urns(pots)  in Google Docs and the Urn was, of course, clay and bought and decorated to fit their chosen style.

Finally,  I suggested three resources for teachers as “backpocket” ideas (all good teachers have those) for early finishers. My picks were: typing practice (we use an site called typingtraining.com), Scratch for creativity and programming and abcya.com or BrainPop’s Game Up for some educational games.

Overall, this rollout has been reasonably smooth with lots of excellent collaborations and definitions. Going forward we will be analyzing projects using Puentedura’s SAMR model and aim to design learning experiences for students that fall into the “redefinition” area.  It is always a great start to class when the students say “yeah, we’re Surfacing today” when myself or colleague roll the carts into class. A few interesting questions and challenges came up but that is for future posts. Next up, I am building a WBLT (web based learning tool) for teachers to explore at their own pace which mirror our ongoing discussions and activities around technology integration.  I look further to sharing updates on our progress.

~Anthony

The Surface and Beyond: implementing the Surface Pro 2 with junior students: Part 2 – Communicate

Phase 2 communicate
After having established our vision for the devices, I now focused on efforts to collaborate with our teachers and learning community to get ready for the implementation stage (Phase 3). We are encouraging teachers to use tablets to support a anytime, anywhere and “anybite” (i.e. 5 min.,10 min.,30 min. or ?) model for learning.

In this stage, I offered regular F2F sessions on Wednesday morning, regular correspondence though email, shared documents in Google Drive along with informal discussions and sessions. Eventually, I would love to share and connect with a significant majority of colleagues in school through social media like Twitter or Google+ but I have to go where my audience is. At the moment, our audience uses email for everything. So what did we talk about in those F2F sessions..?

Excerpt from my OneNote binder

One note phase 2

1. ISTE expectations for students

ISTE-Nets-Graphic

The ISTE standards were helpful for providing overall expectations and addressing what students should actually know about using technology in their learning. We also supplemented our discussion on the Digital Citizenship section of the NET-S with Common Sense Media resources. In addition to the ISTE standards, we obviously mapped our activities to support Provincial standards and added more specific skills to meet the expectations of each area i.e. teaching a Grade Four student to correctly cite digital images would fall under the Digital Citizenship banner.)

2. SAMR model
doi:10.3402/rlt.v22.22648

As a group we explored this model as a guide to current and future practices with technology. We saw the benefit to creating  new projects and experiences that redefine the learning experience for students leverage these devices. However, this process cannot happen overnight and perhaps it is more helpful to first define activities and current practices in the SAMR model (i.e. Typing in Word as “substitution” etc.) before moving on to new practices. In other words, we cannot quite abandon all activities that are not in the “redefinition” category but evaluate each activity on its own merits for learning. After all, some substitution activities have value for learning. Eventually, we will strive to have a significant number of redefined activities and experiences never before possible in a traditional classroom. However, we need to work progressively and incrementally with teachers to help them define and work through each stage in order to understand the learning benefits of new and exciting pedagogies that leverage technology.

3. Workflow diagram

eBackpack-workflow-full-blown
I adapted this diagram created by e-Backpack and to use with Google Drive, Blackboard (our LMS) as well as other cloud-based applications to drive our workflow with our Junior students. We found that this diagram helped us envision how the process of learning might look in a tablet environment and invited changes, suggestions and clarifications. This workflow discussion led to further discussion and training ideas on collaborating using Docs, Forms, Spreadsheets or Presentations. In addition, determining the most effective pedagogy and the application from Google  (Lucidchart (graphic organizer) (although I prefer popplet.com),  Kaizena (Voice commenting), Floor Planner and Powtoon (Animated presentation tool) will be areas for future sessions,  discussions and sharing.

4. Lots of other quick tips and resources

At the beginning of the F2F sessions, we took time to learning the in’s and outs’s of the Microsoft Surface Pro 2 and explored tips and tricks specific to Windows 8.1. For this part of the PD, I leveraging Twitter and in specific @surface  and @MicrosoftPIL for useful resources and guides.

Here is one of many example graphics that posted in our training resources.

finding your apps on surface

Reflection

What is interesting to me about this stage is that it is now ongoing and never has to end. I can provide links and resources for teachers and vice versa until we all feel comfortable sharing tips and tricks to improve student learning. Helping teachers develop a PLN using Twitter, Zite, Flipboard and other sites would be a valid next step to build our collective and shared knowledge and experience to aid student learning. (Here is a post I like that discusses one vision for “information wrangling.) For me, Zite, Flipboard and Twitter do the trick for anytime, anyplace, “anybite” (Have 2 min?) with next steps being emails to colleagues, or posting to Twitter, Delicious ( links), OneNote (articles and files) and perhaps eventually my blog at WordPress (for hopefully semi-articulate posts:))

For the next round of training and professional development, I would love to create a self-directed course on our LMS where teachers who learn best on their own and often forget (ahem) things eplore once in lessons or professional sessions. (Full disclosure – this is one of my learning styles (or I’ll call it a quirk.)

In addition, working with parents and our wider learning community is also worthy of some consideration too. (That deserves much more discussion.)

Here were some ideas I had for future sessions but I have no doubt this list will change with feedback as well as some ideas from my PLN.

  1. Recording,  collecting and assess student responses i.e. Socrative, Top Hat and Poll Everywhere
  2. Allowing students to tell stories through video i.e. Camera app, Movie Edit Touch
  3. Using tablets for personalized PD i.e Twitter and Flipboard
  4. Using OneNote to collect and assess student learning
  5. Using OneNote (Windows 8 version) for daily lesson plans and materials (stylus at the ready!)
  6. Live sharing of content and learning using NearPod
  7. Leveraging QR codes for students to explore and learn i.e. QR scavenger hunt
  8. Blogging and microblogging with students to share and connect i.e. KidBlog, Scrawlar
  9. Creating teacher-made screencasts using the Surface for use before, during and after class i.e.”Flipteaching”
  10. Collaborative writing using Google Docs (Our “workflow” diagram in action, voice comments etc.)
  11. Using Google Forms to create quizzes, assessments and activities for students

Next up, Stage 3 implementation with the students.

Digital Citizenship for the m-generation (K-6 edition)

infographics_digital_citizen_k-5 Untitled Infographics_Post a Photo_letter_051712_letter size bf u click iphone Poster version
In this age of anytime, anyplace and any-device connectivity, this “always-on” m-generation (m is for mobile) has unprecedented opportunity to share and connect globally. Children are challenged everyday to make ethical decisions and choices that impact their digital footprint now and potentially forever. Increasingly, our children are seeking opportunities to share and connect using their favourite apps, devices and even popular social media tools like Instagram or Twitter. So how do we guide them to protect their privacy, act ethically, demonstrate empathy and use technology appropriate to the their age and stage. How do we teach them (as Oprah?! suggests) to be “heroes who do good when no one (and everyone…now and in the future) is watching?”

The umbrella term for this concept is “digital citizenship” and its presence in today’s Ontario curriculum is small but change is no doubt coming as influential organizations like ISTE with their Standards for Students (formerly NET-S) include it as a major strand of learning for technology. In addition, technology like social media, mobiles, tablets and web 2.0 tools are increasingly integrated (I like the phrase, embedded) across an increasing amount of our curriculum. I believe we have a responsibility to teach, empower, protect and guide our students to use technology safely both inside and outside the school walls for the good of others and themselves.

And their exposure to technology and sharing tools is happening at an increasingly younger age. At school, conversations about sharing I am having with students in Grade 5 are increasingly happening in Grade 1 or 2. The advent of popular creation (and connection) tools like Minecraft and the opportunity to connect through a myriad of game systems,  plus the ease of use with apps like FaceTime etc. means that we need to advise, help and manage our younger techies who have the savvy to use the technology but are still developing the judgment and ethical guidance to protect themselves and others. Open and transparent communication about digital citizenship and careful and considered access to technology from the early primary years and up (“sandboxing”) will help to build trust and aid students to make better choices when using a variety of devices in a variety of situations.

Here is an overview of the resources we use to promote and explore this topic with our students starting in Grade One.

Students learn Digital Citizenship (Internet Safety) as part of our Information and Communication Technology curriculum.  About twelve years ago, I began teaching our students in Grade Five about how to keep themselves safe on the internet (back in the day we called it the “Internet Driver’s Licence” and they had to “pass the course” to access email and use the “Internet Super highway” !!) Each subsequent year, our curriculum expanded to include more elementary students as they access the internet, play games and use a variety of devices (in variety of settings) at an increasingly younger age.

In Grade One and Two, we focus on accessing safe and approved websites, protecting their privacy, maintaining a good digital footprint, creating our own digital projects and acknowledging the creativity of others. Most importantly, students are encouraged to protect themselves and to ask for help when learning about the online world. We primarily rely on the Common Sense Media resources which offer excellent guidance and resources for students, teachers and parents.

In Grade Three, students access educational games and resources using a resource called Digital Passport. This site (and now app) from Common Sense Media includes age appropriate and educationally rich activities and resources on privacy, safe passwords, digital etiquette, protecting against cyberbullying, fair use of media, safe searches and good use of digital communications. Here is a link to my detailed review. Other resources include digital citizenship videos and activities from Brain Pop (Gr.3 and up) and Brain Pop Jr. (Gr. 1-4) as well as other lessons and resources.

In Grade Four, Five and Six, our students are using the internet frequently to learn, play and communicate with others. There are a number of lessons devoted to Digital Citizenship throughout the year as students increasingly use email, our Learning Management software (Blackboard) and other tools to learn and communicate their learning. Connect Ed. has an excellent curriculum guide called reallifeonline.ca with grade specific resources, lessons and activities. Another excellent source is a site called Media Smarts which includes activities and games on media and digital literacy. Their Passport to the Internet resource covers netiquette, maintaining a safe digital footprint, online privacy, security, preventing cyberbullying, harassment, impersonation and hidden identities. In Grade Six, students learn Digital Citizenship as an online course and topics include: making smart choices online, using technology and games in moderation, risks of social networking, responsible use of media, cyberbullying and setting up good privacy and security settings on devices and other technology.

Here is a partial list of useful resources for K-6 educators (most are free)

Common Sense Media – a complete K-12 scope and sequence, adopted by schools in a variety of countries.
Digital Passport – Games, videos and activities, recommended for Grade 2 -5 students

Kidsmart – Early Surfers Zone– 2 digital citizenship ebooks with lesson plans, games, videos and resources for SK-Grade 2 students
Kidsmart – KnowITall: online videos, activities and lessons on internet safety for Grade 2 -5 students

Mediasmarts.ca – comprehensive Canadian website on media and digital literacy and Passport to the Internet* (Gr.4-6)

Cyber café – Learn about email, social networking, safe searching & mobile technology for Grade 3 -6 students
Cyber-5 – Story and quiz on online safety – Grade 1 -3 students
Brain Pop* – digital citizenship videos, quizzes, lesson plans and activities for Grade 2 to 6
PBS Webonaunt game – a digital citizenship game for Grade 4 to 6
Digizen – a digital citizenship resource site with good resources on the risks of social media
Even Google have gotten in the act with their Digital Literacy and Citizenship curriculum
A comprehensive list of the Kidsmart resources  for K -12 students and educators

Let me end with a quote from a recent study which emphasizes the need for digital citizenship to be embedded in the Ontario elementary curriculum. “Some teachers whose project was in the early elementary years, felt that getting notions of digital citizenship in from the beginning of school life would alleviate many problems later as that knowledge would be taken for granted as children moved through the grades.” from a research paper posted on the Ontario Ministry of Education website called “Shifting landscapes…” by Pauline Biggs from Curriculum Services Canada.

I hope those resources aid your digital citizenship discussions in your class and school. On Twitter, I use two good hashtags for this topic: #digcit and #cybersafety. I can be reached on Twitter @anthonychuter and at my professional blog at ict4kids.ca.
~Anthony
qrfree_kaywa blog post

* not free

Writing Reflective Blogs in Blackboard

One of the advantages of our password-protected Blackboard site is the option to create a safe place for students to write, collaborate, edit and share. Setting up a blog is a great option for assessing student writing in a simplified format (i.e. not for elaborate Word docs with graphics, interesting fonts choices and backgrounds etc.) and creating and organizing a digital collection of student writing. This blog option can be customized to be private between you and your student or visible to all students in the class or grade for reading, commenting or peer editing. This tool also eliminates the need for transferring documents from home to school using USB drives, email or other online means. Students can login into Blackboard, click on the link and begin writing immediately. You can give direct feedback as a comment and have full control to delete or edit anything posted by you or your students.

There are two steps. In the first video, I demonstrate how to set up the blog and in the second video I cover posting a link for student access.
1. Setting up a Blog in Blackboard

2. Posting a link for student access to the blog

P.S. Remember only student accounts (i.e. 11111) can access the blogs and not the observer parent account (i.e. chu1643)

Technology Integration and the SAMR model

What is Technology Integration?

Technology integration is when students to learn, explore and create in a variety of subjects using technology.  The focus is on exploring good essential questions or themes with technology (technology integration) not on the device or software itself (using technology.) In my ICT classes, I strive to expand upon exciting themes and lines of inquiry in our lessons, activities and projects while meeting both the ISTE-NETS standards and CommonSenseMedia.org expectations. The new setting of the lab provides a new environment with new online tools for their research, exploration, collaboration, creation and sharing. The open “secret” is that a good theme or a rich essential question is never answered or finished as there is always more to know. (Although, students are pretty honest (thankfully) when they are ready to ahem -move on!)

Collaborating with teachers and students is critical for the success of technology integration. (I ask so many questions on what students are learning in other classes, I call myself Mr. Nosy. A colleague called Garth Nichols calls himself “the destroyer of classroom walls” which I like too!) Effective time to collaborate, plan and share will help determine where the theme or inquiry is to be explored (class, lab, home, school, all…) and what the best approach (pedagogy) for learning (team teach, solo effort, flipped, blended, F2F, online etc.)

My 3 reasons technology integration is effective for students

1. An integrated approaches validates the topic i.e. The student believes that this topic is important as multiple teachers are talking about it.
2. The lab or devices (or me too!) provide new tools (online) and a different context (software) to explore the topic
3. Allows students to study topics in greater depth (They bring their prior knowledge to class and they transfer their learning from ICT to other subjects.)

What is the SAMR model?

The SAMR model was designed by Dr. Ruben Puentedura and allows teachers to evaluate how technology enhances or transforms the learning experience. Is it substitution of a practice already occurring WITHOUT technology?  Does it augment the practice with additional features? Does it modify the task in different and exciting ways? Or does this technology completely redefine the task?

SAMR

How is the SAMR model useful for technology integration?
While researching  mobile technology and pedagogy for my graduate course, I discovered that the SAMR model was a perfect complement and expression of my current integrated approach to the curriculum with technology. Before learning about it, my simple goal was to ONLY integrate technology that enhanced student learning and knowledge. The SAMR model takes this idea one step further by breaking down the manner of that integration in projects or activities. This is an excellent resources for curriculum planning and collaborations with colleagues.


Reflecting upon the SAMR model

In my initial enthusiasm, I boldly declared (thankfully to myself!) that all my student activities with technology should be redefinitions. This is lofty goal will surely be true someday very soon but for now in 2013 a healthy balance of activities in different areas of the model might be best to win over all parties in our environment.

Final note – although this post refers to technology integration into classes, I am lucky to work with other specialist teachers who ALSO believe in an integrated approach. Thankfully, Art, Music, Physical Education and other Languages are spread liberally through the experiences and curriculum of students. AND being nosy I try to find out what all the specialists are doing too for integration opportunities. Perhaps I should wear a t-shirt with Mr. Nosy from the Mr. Men on it!

Further Questions
Should we use the SAMR to classify apps/software or tasks/inquiries or a combination of the two? (leaning towards to the latter)
example poster – Apps in Education SAMR poster
Where does PBL (Project based Learning) fit into the SAMR model?

Further resources on Technology Integration
A useful flowchart for Technology Integration  – So helpful for teachers evaluating when to use technology in their lessons.
Mitchel Norris’s exploration of Tech integration vs.Tech classes – I am arguing that a mixed approach works very well i.e. 1:1 environment  + ICT classes + integrated projects = 🙂Research from Edutopia on Technology Integration – lots of case studies and different model to explore
Excellent chart on “Using Tech vs. Tech. Integration” – clear and helpful!

Further resources on the SAMR model
Dr. Ruben Puentedura’s weblog – lots of slide decks on emerging technologies and exploring Horizon reports past and present
Dr. Puentedura’s slidedeck on SAMR(and TPCK)  models in Action – Some great examples and advice when considering technology integration
Jennifer Magiera’s blog post on using SAMR model for iPad integration – useful for us as we integrate iPads in classes!
Jamie Richard’s exploration of the SAMR model for Tech. integration into his middle schools classes
Allan Carrington’s Padagogy Wheel – combining the SAMR and Bloom Taxonomy for iPad apps and activities

Using Digital Passport with Grade 3 and 4

dp finished sample screen
What is Digital Passport?

Digital Passport is a web resource for students from Grade Three to Five to learn technology skills and and learn digital citizenship. The site includes six areas in digital citizenship with videos, lessons plans, assessment tools and fun, kid-friendly activities. The topics include password management, protecting privacy, preventing cyber-bullying, safe searches on the internet and respecting the creativity and work of others. It is also free(!) and is easily incorporated in schools that follow the ISTE NETS-S standards and supports the comprehensive Digital Citizenship curriculum offered by the Common Sense Media.

How did you use DP in the classroom?

I started each class by gathering students on the carpet to review one idea or concept i.e. creating strong passwords. I also played a short introductory video clip followed by a brief discussion to address any questions or concerns. The video clips were great because they featured kids about the same age or a little bit older. After the instructions were clear, students then completed a related game on the computer. In the Educator Materials section of the DP site, there were additional multimedia resources helpful to both our discussions and activities. As students completed activities, they earned badges and gave themselves a checkmark on wall chart. This badges and checklist were great motivators and they not only loved checked off activities completed in class but were also eager to share when they earned badges at home.

dp sign up2
How did you assess their learning?

The site allows you to create classes and provide each student access with a username and password. The advantage of creating individual accounts at this site is that you can collect and save data on their progress. You can access this information individually or as a whole group to get an overall idea of the class’s mastery and understanding of specific topics. For example, I discovered that students scored the lowest on their keyword and search skills which gave me a chance to address this through follow-up activities and discussions. I often used the individual results to reward high scores with stars on the wall chart or encourage the students to revisit areas and activities with a lower score. However, in the end, I decided not to use their score in the game as part of my mark breakdown (i.e on a report). I treated their progress like a pre-test (i.e. assessment AS learning) and followed up the unit with a “clicker” quiz as my assessment OF learning strategy. Ultimately, the most rewarding discussions (and assessment) occurred when I circulated the class as students completed assessments. Giving out certificates was fun too!

Reflections

After completing the unit with the Grade Three and Four students, I would definitely want to use this resource again as it prompted many excellent discussions and teachable moments. We often have the perception that this generation of students are really tech savvy and technology comes very natural to them. However, I believe that is mostly true about their own technology and interests. This resource was useful in our digital citizenship activities because it challenged their thoughts, ideas and experiences with realistic “what- if” scernarios. In class, I enjoyed many teachable moments where I could offer advice reinforced by the videos and activities to help them make excellent choices when online. Overall, Digital Passport is a useful resource for teaching and exploring digital citizenship questions with Grade 3 and 4. However, completing the games is not guarantee of mastery. Activities from the “expert zone” (another area of site), other resources like Brain Pop, media smarts, Netkidz and Cybercafe provide and much discussion, questioning and modelling are an excellent approach to covering this topic comprehensively.

Any suggestions or improvements?

More activities would be great. Topics that might benefit from expansion might be media awareness (i.e protecting against advertisers), creating a good balance on-line and off-activities, and effective communication (i.e when best to text, email F2F etc.). Also a version for Grade 6 to 8 with particular emphasis on mobile devices and the benefiits and risks of social media would be helpful. I understand that an iOS version is also on the way which is great too.

My reflective questions and next steps

How do I help teachers promote digital citizenship across different areas of the curriculum?
What is the best way to support parents to find technology safely and effectively at home?
Post to my blog my comprehensive list of digital citizenship resources for the Grades taught