Ok, so now comes the fun part (i.e. less talk more action!) where we actually put the devices in the hands of our students. We have created a vision, planned and collaborated and communicated as professionals, set up routines for support among other steps outlined in prior posts. In fact, in the meeting prior to this stage, I got the impression that all the teachers were ready to get going. I shared this feeling too and but felt it was a good sign that the communicate stage (from the Common Sense Media site) had been comprehensive enough and they were ready to have a go with this disruptive yet exciting technology in the class. In truth though, this communicate stage does not stop ever but shifts some of the conversation from planning to implementing and then reflecting on the learning opportunities for students. In other words, back to business as usual (plan, teach, reflect) but with an added technology platform available anytime or anywhere or any size of learning tasks.
In specific, our Grade Three-Five classes had access to three carts bookable through shared calendars in Outlook and we planned a few initial lessons and pilot projects for each grade.
Below are a few resources I used with students during the first lessons. We started by discussing rules, strategies and routines for the new devices on the classroom. Students had already signed an Acceptable Use Policy (AUP) at the beginning of the year. Next year, the tablet implementation and AUP can go hand in hand in our September rollout. However, this third term rollout was great for a trial run and a short turnaround before we reflect upon the experience and start a entire year with these devices at our disposal.
This slideshow requires JavaScript.
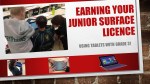
I focused on the opportunities for learning that these devices provided and invited students to earn their “Surface licence” through a checklist of activities. I adapted this routine from Suzie Brooks’ excellent GradeThree blog which outlined her iPadding rules and I also drew inspiration from activities teaching in the early days of the internet where students had to earn their “internet driver’s licence” to go online. (These days students earn that “licence” really early at home with all the devices available to them!) However, the idea of the licence is a good one in a classroom as it acknowledges that using the device effectively is a learned skill (i.e. like driving ) and students need to protect themselves and others while engaging in rich learning experiences.
Here is a copy of the Power Point slides I used with our Grade 3 students.
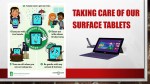
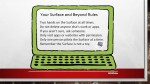
I also provided a few posters along with the Surface Rules and their signed licences and asked if teachers could find a place for them in the classroom. I felt that these could be references by teachers and students if and when needed. All these posters are found from the Common Sense Media site.
After this lesson, the classes were off and running; creating and sharing a variety of pilot projects. In Grade 3, students were adapting their “Hamburger” writing into a recorded slideshow format for sharing. (“Hamburger” writing is of course the introductory and conclusion sentences as the buns plus 3 juicy facts of research in the center of the burger but you knew that 🙂 In Grade 4, the students were researching Ancient Civilizations using collaborative Popplets as a graphic organizers and the Google Slides as their final presentation tool. Grade 5 students were creating a Grecian Urn and completed sketches on an app called Fresh Paint, researched a report about Grecian Urns(pots) in Google Docs and the Urn was, of course, clay and bought and decorated to fit their chosen style.
Finally, I suggested three resources for teachers as “backpocket” ideas (all good teachers have those) for early finishers. My picks were: typing practice (we use an site called typingtraining.com), Scratch for creativity and programming and abcya.com or BrainPop’s Game Up for some educational games.
Overall, this rollout has been reasonably smooth with lots of excellent collaborations and definitions. Going forward we will be analyzing projects using Puentedura’s SAMR model and aim to design learning experiences for students that fall into the “redefinition” area. It is always a great start to class when the students say “yeah, we’re Surfacing today” when myself or colleague roll the carts into class. A few interesting questions and challenges came up but that is for future posts. Next up, I am building a WBLT (web based learning tool) for teachers to explore at their own pace which mirror our ongoing discussions and activities around technology integration. I look further to sharing updates on our progress.
~Anthony