Mobiles in the 1 device classroom and beyond

Everywhere you look mobiles are having a dramatic impact on the world around us. Ask yourself…how have you used your “phone” in the last week? I sure your answers are varied and will amaze you.

But what about the classroom…teachers are realizing the potential for the anyplace, anywhere, anytime aspect of mobile devices as an powerful resource for learning, creating and sharing.

“In addition, since the fourth quarter of 2010, smartphone and tablet sales have exceeded PC sales – and the growth trends continue to favor these newer devices. Mobile devices now account for 13% of global Internet traffic – and rising.”

Source: http://readwrite.com/2013/05/13/mobile-is-taking-over-the-world

Here are 3 examples of sample activities for teachers in the one device classroom.

1. Use your phone to record (i.e. oral assessments, collaborations and for multimedia projects) I use Evernote, VoiceThread and an app called  Recorder Pro)
2. Take pictures as Assessment as Learning (i.e. spreadsheet with check boxes or take photos for reviewing, sequencing and reflecting)
3. Access and edit critical files (schedules, team lists, check lists, PDFs )through apps like Skydrive, Dropbox and Google Drive (in the last one, up to 50 people can collaborate on one doc, spreadsheet or presentation)

My examples are from the Apple App Store but if that specific app is not available, there are many similar alternatives in other app stores (most are free too!)

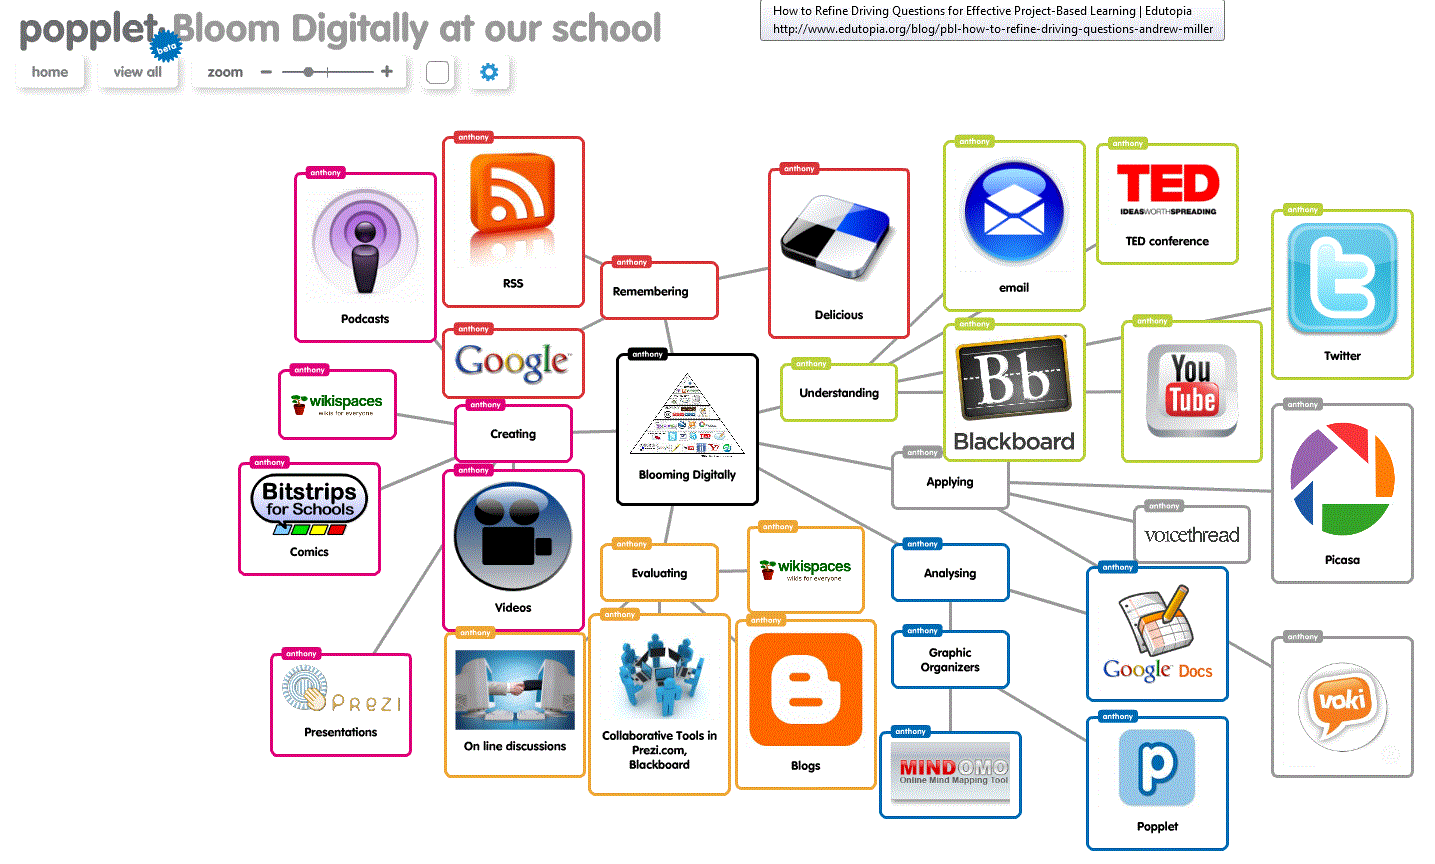
With mobile technology (phones and tablets), learning is now anytime and the “classroom” anywhere. Many people are using apps to learn, create, communicate and share in new and exciting ways. However, I believe it is a mistake to focus on the apps themselves. Instead, perhaps the focus should be on how mobile tech. creates new and engaging learning opportunities for ourselves and students. Dr. Puentedura’s research examines how we use the technology to transform and redefine learning experiences for students. See my blog post on Puentedura’s SAMR model which has been a great influence on my integrated approach to educational technology. How can we use this technology to provide new pedagogies to prepare them for the future? As for apps…as the iPad ad says: “there is an app for that!”

Here are some learning opportunities for mobile devices and some example apps.

  1. Read (and discuss) Professional Development articles on your subject or interest (i.e. Zite, Flipboard, Twitter…)
  2. Collect and curate articles, graphics, videos… for sharing (i.e. Delicious, Diigo, Pinterest…)
  3. Scan, display and analyze student work (i.e. HD Scanner, Camera app,)
  4. Create a digital notebook of student work for assessment and sharing (i.e. Evernote, Good Reader)
  5. Transform text into audio (i.e. Qwiki, Speak! or adjust assessability settings in an iPad)
  6. Create a collaborative digital poster (i.e. Padlet, Lino it)
  7. Create a collaborative graphic organizer (i.e. Popplet)
  8. Create, edit and share a slideshow or movie (i.e. iMovie, VoiceThread, Animoto)
  9. Connect your class with experts, teachers  or other classes (i.e. Google Hangouts, Skype etc.)
  10. Write, record, sketch your notes (i.e. Penultimate, Notability)
  11. Compute complex calculations (i.e. Calculator, Numbers etc.)
  12. Organize, share and manage your school calendar (i.e. ITeacher Book, Google Calendars etc.)
  13. Quickly contact groups of students or teachers through text messaging (i.e.  Remind 101)
  14. Make sketches to teach and share (i.e. Educreations, Explain Everything, Show Me)
  15. Sign or annotate and return a .pdf without printing (i.e. Acrobat Reader, Good Reader)

This is list is far from exhaustive and I hope not too overwhelming.

Hopefully, you have had at least one takeaway tip. I have enjoyed sharing my research and ideas from colleagues to help you and your students. Thanks for reading the final tip before summer. (Yippee!)

Anthony

My Twitter handle for questions and further discussion – @anthonychuter
F
or further discussion of this topic check out my group project and research on mobile technology in the class.

9 YouTube tips and tricks for teachers

These tips are great for supplementing your own flipped videos uploaded to YouTube or other videos you use in class i.e. Khan Academy.

  1. Tubechop – This site allows you to choose a specific start and end point for a YouTube clip. This is great for reviewing parts of videos in lessons, differentiating clips for students and editing longer videos. I use a one minute per grade guideline (i.e. Grade 5 students should not watch clips of more than 5 minutes) in order to keep instructions short, sweet and specific.
  2. ViewPure– All the great YouTube video goodness minus all the ads and links. I have it on my Internet Explorer+Firefox toolbars for easy use.
  3. Hyperlink to specific point in a video
    1. “It’s possible to link directly to a specific point in a YouTube video. Play the video, and keep an eye on the white blob that moves along the timeline below the video, (the thing you drag to move forwards/back through the video). When you get to the point in the video that you want to jump to, right click on the blob and choose “copy video URL at current time”.

If you now use this link as a hyperlink in your IWB software or PowerPoint, the video will start playing at the point that you chose.”

Number 3 was from this site

4. Video Notes – a very useful web app that allows you to create and save notes with a YouTube clip. Perfect for teachers and students in the flipped class and saves nicely with Google Drive too. Here’s the URL since it is not a top link from a web search. http://www.videonot.es/

5. Tubesnack – Create a playlist of YouTube videos. Great for a collection of clips on a particular theme or topic. Share by URL or embed in a website or LMS like Blackboard

6. YouTube to .mp3 converter – Sometimes you just need the audio of a particular clip, this site helps you convert your video clip into audio. Shout out to language and music teachers on this one but all teachers will benefit from another nice handy tool for YouTube.

7. Watch2gether

It ,as its name implies , allows its users to watch YouTube videos simultaneously. You can now share and enjoy YouTube videos with your colleagues (and students) in real time on their devices.

8. EmbedPlus

EmbedPlus enables its users to start their videos at a chosen time , skip self-defined chapters, and add captions and annotations

9. Tubesnack – Enables you to build a YouTube playlist of videos on particular theme or topic.

This is my list of sites that I use frequently in my classroom. Here are two excellent blog posts that I used for reference and contain similar and additional links.

From Danny Nicholson’s Whiteboard Blog

From Med Kharbach’s Educational Technology and Mobile Learning Blog

My top 5 Avatar creation sites for students

Can you match the avatar style with the websites below?

mrc.2voki sampledoppleacmiiacmrc lego head

Here are my top 5 favourite (Flash-based) websites for creating student avatars. Creating avatars allows students to include personal digital representations of themselves for online or in digital materials without relinquishing any privacy. Plus they are fun to create and a kid-friendly addition to any project, presentation or learning material.
  1. Nintendo Wii – Who doesn’t love creating a Mii!
  2. Lego – A class favourite but try “snipping” only the heads and shoulders to avoid “lightsabers” and other Stars Wars© paraphernalia
  3. Manga – perhaps better suited for students 11+
  4. Bitstrips or BitstripsforSchools.com – Now a Facebook app but a popular choice as all Ontario students have freeaccess to Bitstrips for Schools.
  5. Dopple Me –  Another favourite!

+1 Bonus – Voki – Why not add your voice to an avatar too!

It should come as no surprise that students love creating them and they are great as signatures for wikis, blogs, documents, websites etc. I find them especially useful in Voice Thread or other online sites or games that offer the option to upload a picture. Remember that blank is always an option but a cartoon avatar is fun and safer than a photo. Use the “snipping tool” or another screenshot tool to take a .jpg (or other picture file) of your avatar to share in other sites.  I keep a .jpgs of cartoon avatars in my Dropbox account ready to be used in projects or uploaded to sites. Now if only those the avatar creation sites for The Simpsons and Diary of a Wimpy Kid start working again…

P.S. Did you guess them all? Perhaps you will have to visit each site to find the answer.  While you are there, go ahead and create+save an avatar of yourself too! Consider it your professional development for the day! 🙂 Below is an avatar of one sad little lad in our house with the current states of the TFC, the Toronto Maple Leafs and Blue Jays this year! “Maybe they will win next year Dad!” I am crossing my fingers for him!
sad matty

Cheers,

Anthony

Creating and sharing graphic organizers using Popplet

digital popplet2
Popplet is a great mind-mapping and graphic organizer tool to aid planning and writing. Not only can you add text to your graphic organizer but you can also add a variety of sketches, graphics and multimedia. Collaborating with multiple authors is easy through a shared link as your file is stored in the cloud. (The hidden notes page is great for assessment or feedback from you!) Finally, the presentation mode allows you to create and navigate through a path of views from one “popple” (box) to another through your arrow keys.

Here are a few screencasts I made, that you are welcome to use in your classes. Lots more available on YouTube.(without my squeeky voice through:P)

Creating an account in Popplet

Getting started in Popplet

Student sample –Gr.4 Canadian physical region http://popplet.com/app/#/311851
Gr.4 Muslim Influence on the Medieval Europe – http://popplet.com/app/#/812393
Diversity of Living Things – Educator sample http://popplet.com/app/#/901161

This software is available in Windows and iOS and recommended for students from Grade 4 and up.

Writing Reflective Blogs in Blackboard

One of the advantages of our password-protected Blackboard site is the option to create a safe place for students to write, collaborate, edit and share. Setting up a blog is a great option for assessing student writing in a simplified format (i.e. not for elaborate Word docs with graphics, interesting fonts choices and backgrounds etc.) and creating and organizing a digital collection of student writing. This blog option can be customized to be private between you and your student or visible to all students in the class or grade for reading, commenting or peer editing. This tool also eliminates the need for transferring documents from home to school using USB drives, email or other online means. Students can login into Blackboard, click on the link and begin writing immediately. You can give direct feedback as a comment and have full control to delete or edit anything posted by you or your students.

There are two steps. In the first video, I demonstrate how to set up the blog and in the second video I cover posting a link for student access.
1. Setting up a Blog in Blackboard

2. Posting a link for student access to the blog

P.S. Remember only student accounts (i.e. 11111) can access the blogs and not the observer parent account (i.e. chu1643)