Creating and sharing graphic organizers using Popplet

digital popplet2
Popplet is a great mind-mapping and graphic organizer tool to aid planning and writing. Not only can you add text to your graphic organizer but you can also add a variety of sketches, graphics and multimedia. Collaborating with multiple authors is easy through a shared link as your file is stored in the cloud. (The hidden notes page is great for assessment or feedback from you!) Finally, the presentation mode allows you to create and navigate through a path of views from one “popple” (box) to another through your arrow keys.

Here are a few screencasts I made, that you are welcome to use in your classes. Lots more available on YouTube.(without my squeeky voice through:P)

Creating an account in Popplet

Getting started in Popplet

Student sample –Gr.4 Canadian physical region http://popplet.com/app/#/311851
Gr.4 Muslim Influence on the Medieval Europe – http://popplet.com/app/#/812393
Diversity of Living Things – Educator sample http://popplet.com/app/#/901161

This software is available in Windows and iOS and recommended for students from Grade 4 and up.

Writing Reflective Blogs in Blackboard

One of the advantages of our password-protected Blackboard site is the option to create a safe place for students to write, collaborate, edit and share. Setting up a blog is a great option for assessing student writing in a simplified format (i.e. not for elaborate Word docs with graphics, interesting fonts choices and backgrounds etc.) and creating and organizing a digital collection of student writing. This blog option can be customized to be private between you and your student or visible to all students in the class or grade for reading, commenting or peer editing. This tool also eliminates the need for transferring documents from home to school using USB drives, email or other online means. Students can login into Blackboard, click on the link and begin writing immediately. You can give direct feedback as a comment and have full control to delete or edit anything posted by you or your students.

There are two steps. In the first video, I demonstrate how to set up the blog and in the second video I cover posting a link for student access.
1. Setting up a Blog in Blackboard

2. Posting a link for student access to the blog

P.S. Remember only student accounts (i.e. 11111) can access the blogs and not the observer parent account (i.e. chu1643)

Technology Integration and the SAMR model

What is Technology Integration?

Technology integration is when students to learn, explore and create in a variety of subjects using technology.  The focus is on exploring good essential questions or themes with technology (technology integration) not on the device or software itself (using technology.) In my ICT classes, I strive to expand upon exciting themes and lines of inquiry in our lessons, activities and projects while meeting both the ISTE-NETS standards and CommonSenseMedia.org expectations. The new setting of the lab provides a new environment with new online tools for their research, exploration, collaboration, creation and sharing. The open “secret” is that a good theme or a rich essential question is never answered or finished as there is always more to know. (Although, students are pretty honest (thankfully) when they are ready to ahem -move on!)

Collaborating with teachers and students is critical for the success of technology integration. (I ask so many questions on what students are learning in other classes, I call myself Mr. Nosy. A colleague called Garth Nichols calls himself “the destroyer of classroom walls” which I like too!) Effective time to collaborate, plan and share will help determine where the theme or inquiry is to be explored (class, lab, home, school, all…) and what the best approach (pedagogy) for learning (team teach, solo effort, flipped, blended, F2F, online etc.)

My 3 reasons technology integration is effective for students

1. An integrated approaches validates the topic i.e. The student believes that this topic is important as multiple teachers are talking about it.
2. The lab or devices (or me too!) provide new tools (online) and a different context (software) to explore the topic
3. Allows students to study topics in greater depth (They bring their prior knowledge to class and they transfer their learning from ICT to other subjects.)

What is the SAMR model?

The SAMR model was designed by Dr. Ruben Puentedura and allows teachers to evaluate how technology enhances or transforms the learning experience. Is it substitution of a practice already occurring WITHOUT technology?  Does it augment the practice with additional features? Does it modify the task in different and exciting ways? Or does this technology completely redefine the task?

SAMR

How is the SAMR model useful for technology integration?
While researching  mobile technology and pedagogy for my graduate course, I discovered that the SAMR model was a perfect complement and expression of my current integrated approach to the curriculum with technology. Before learning about it, my simple goal was to ONLY integrate technology that enhanced student learning and knowledge. The SAMR model takes this idea one step further by breaking down the manner of that integration in projects or activities. This is an excellent resources for curriculum planning and collaborations with colleagues.


Reflecting upon the SAMR model

In my initial enthusiasm, I boldly declared (thankfully to myself!) that all my student activities with technology should be redefinitions. This is lofty goal will surely be true someday very soon but for now in 2013 a healthy balance of activities in different areas of the model might be best to win over all parties in our environment.

Final note – although this post refers to technology integration into classes, I am lucky to work with other specialist teachers who ALSO believe in an integrated approach. Thankfully, Art, Music, Physical Education and other Languages are spread liberally through the experiences and curriculum of students. AND being nosy I try to find out what all the specialists are doing too for integration opportunities. Perhaps I should wear a t-shirt with Mr. Nosy from the Mr. Men on it!

Further Questions
Should we use the SAMR to classify apps/software or tasks/inquiries or a combination of the two? (leaning towards to the latter)
example poster – Apps in Education SAMR poster
Where does PBL (Project based Learning) fit into the SAMR model?

Further resources on Technology Integration
A useful flowchart for Technology Integration  – So helpful for teachers evaluating when to use technology in their lessons.
Mitchel Norris’s exploration of Tech integration vs.Tech classes – I am arguing that a mixed approach works very well i.e. 1:1 environment  + ICT classes + integrated projects = 🙂Research from Edutopia on Technology Integration – lots of case studies and different model to explore
Excellent chart on “Using Tech vs. Tech. Integration” – clear and helpful!

Further resources on the SAMR model
Dr. Ruben Puentedura’s weblog – lots of slide decks on emerging technologies and exploring Horizon reports past and present
Dr. Puentedura’s slidedeck on SAMR(and TPCK)  models in Action – Some great examples and advice when considering technology integration
Jennifer Magiera’s blog post on using SAMR model for iPad integration – useful for us as we integrate iPads in classes!
Jamie Richard’s exploration of the SAMR model for Tech. integration into his middle schools classes
Allan Carrington’s Padagogy Wheel – combining the SAMR and Bloom Taxonomy for iPad apps and activities

My top 3 online curation tools for teachers and students

Traditionally as teachers, before we start a new topic or theme with our students, we collect a variety of educational resources (activities, worksheets, games, posters, models, songs etc.) to share in lessons or provide as resources for students in the classroom. Using technology, we can also provide multimedia and other interactive materials like graphics, slideshows, videos, files, websites, social media  accounts, hashtags etc. to enhance learning in our classroom and perhaps beyond. It would seem then that collecting a variety of traditional and digital materials would be an effective strategy to differentiate learning for students and appeal to our classes full of “screenagers” but not quite teenagers.

Here are three sites to help teachers curate educational digital content for discussion, resources and sharing with students. In online courses or blended environments, variety is important to help the visuals interesting while creating vibrant, diverse and educational rich experiences remain vital. All are useful in flipped classrooms too! All these sites are perfect for sharing by a link but work best when “embedded” directly into an online course/LMS like Blackboard or Moodle.

1. Symbaloo 
One online tool allows you to create a web page of links (as symbols) to sites on specific  theme or topic. (I find that the more specific, the better; (Grade 2 Time rather than Math.) Your symbaloo can be shared to students (or parents) as a link through email, Blackboard, Twitter etc. Your symbaloo page might be filled with links to websites but could also include links to graphics (from Google images), videos (from YouTube), even files (I used a link to a file in Google Drive) or any material with a specific URL.

Below is a link to a symbaloo I created for Grade 4-6 students to practice their keyboarding skills using a variety of tools.

keyboarding symbaloo
http://www.symbaloo.com/mix/keyboardingresources1

2. Edcanvas

Edcanvas is a website for collecting and assembling a variety of media (images, Word docs, Power Point, videos etc.) as a single presentation/webquest for students. Your “edcanvas” can be shared by email or posted on an LMS like Blackboard. Older students (Gr.4 and up) might create their own “edcanvas” to research and presentation their learning on a particular topic.

Here is one I made for a Social Studies/ICT project in Grade 5.

http://edcvs.co/XJuKkl

3.  Live Binders is one of three excellent websites (Symbaloo, Edcanvas being the others)  to help you collect, curate and present a variety of digital resources for students. Teachers have used Live Binders to build up a collection of images, resources and links on a specific topic. Students (perhaps Gr.5 and up) might also create an account and have their own Live Binder(s) for individual or collaborative research and presentation. Finally, the final product is easily shared with students (and parents) through our LMS (Learning Management System) AKA Blackboard, or email, Twitter etc.

Live Binders for Teachers


Featured Live Binders
(check out the ‘Binders by Grade (scroll down on right of the screen)

http://www.livebinders.com/shelf/featured

Honourable Mention: to MentorMob for the ability to create learning playlists. Next on my list to investigate. Thanks in advance for your comments and suggestions.
~Anthony

Voice Thread with one iOS device or a full lab

vt logo
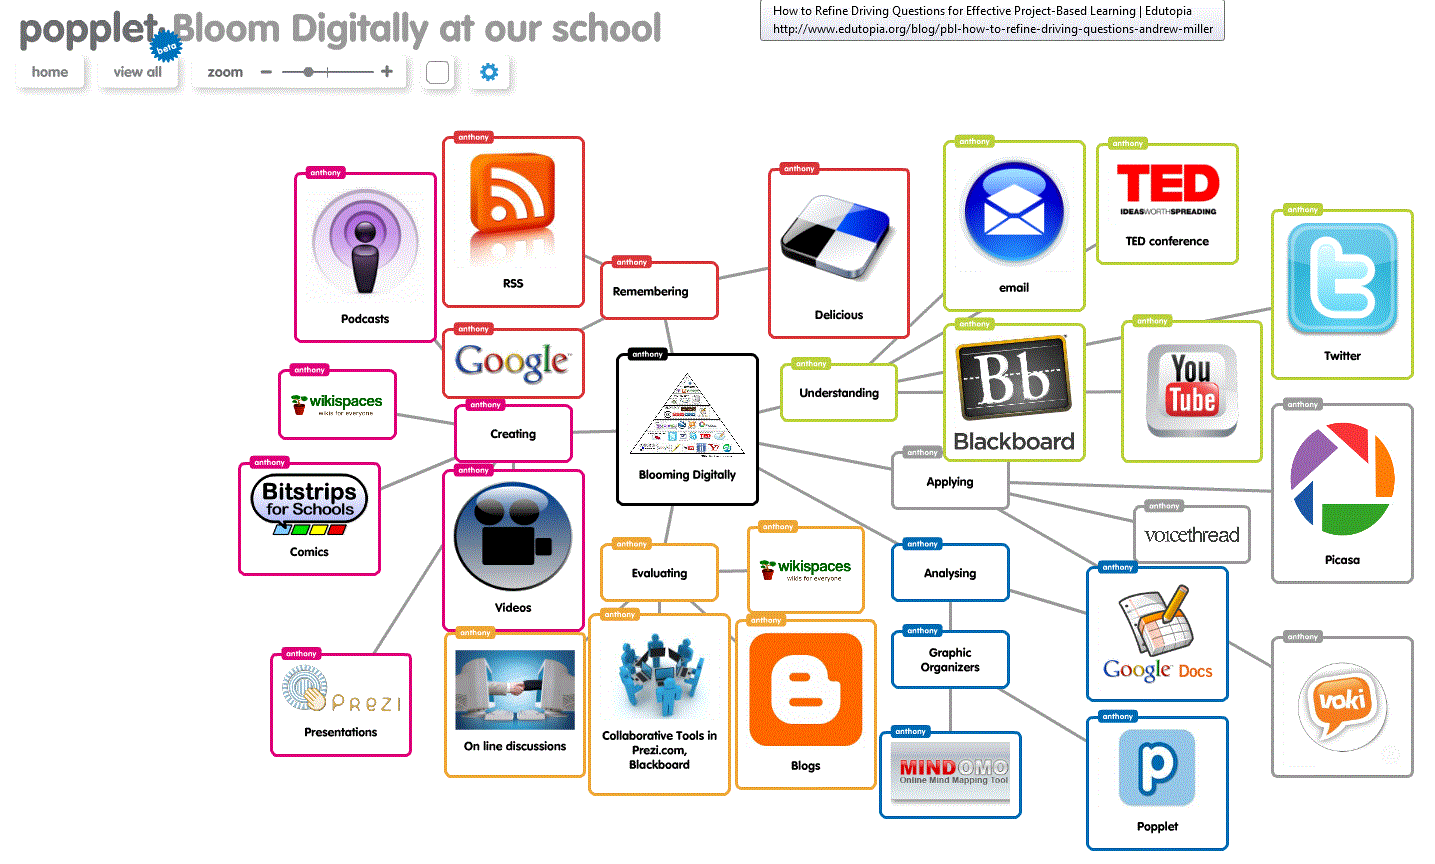
Once I decide (by hunch or “crunch” from my PLN ) that I am willing to try a particular ed. tech. tool, I immediately start my testing process. As an ICT specialist, I find myself exploring a breadth of digital tools. However, a real depth of knowledge is critical for evaluating whether a tool is effective for a specific age and stage, suitable for curriculum integration and promotes 21st century fluency. One strategy for exploring a resource with depth is to integrate the tool with learning as much as possible over the course of a term with a variety of ages, groups and situations. That way I can really get a handle on its potential and limitations. Over the last year, I have been exploring Glogster EDU, Bitstrips for Schools, Popplet (all great BTW and worthy of review) but this term Voice Thread has definitely been my software of choice. (Ok full disclosure, I recently gained access to the Voice Thread admin. tools which was a huge advantage.) Switching between the app on my IPhone and software on a computer has been an excellent “one-two punch” for creating and recording projects, research and learning.

Voice Thread with One iOS device

Circulating the class with my IPhone, I quickly and easily recorded students’ thoughts, ideas and research in the “hustle and bustle” of the classroom. This term, our Grade 1 and 2 students researched specific topics (animals, mapping etc.) on the computer using the excellent Pebble Go site. As I was circulating, I was able to stop, take a quick screenshot or a picture of their collaboration in action and then record audio of them with my smartphone. Some students shared original ideas but other simply read their research which was an excellent way to record their ideas and learning. This collection of thoughts, ideas and collaboration was not only a good source for sharing but also an effective assessment tool. Listening to their progress allowed me to easily analyze their progress. This recorded information was available to be played for me or the students in the next class so I can extend their learning and cover areas that were missed or not explored in depth. What a great record of informal and formal assessment!

Here is an example. (We have a strict privacy policy at our school so the example is only screenshots and voices. Although not shown I recommend using photos of the students to really bring projects to life.)

Voice Thread for Students

We purchased a subscription for students and I introduced this software in our computer lab to our Grade Three students. We had great fun creating avatars, recording using microphones, webcams and sharing ideas. After a couple of classes to explore built-in tutorials and some specific screencasts from me, students were familiar with the interface and we began to use VT to collect and record our research on the Titanic. VT is an excellent and superior 21st century tool, that allowed us to record student ideas, research, questions and collaborations. Eventually, it became an authentic document and record of student learning and ideas with potential for further study either as an assessment tool or just a fun presentation for parents, students who know the students well.

Last year was the 100th anniversary of the crash and so our school had many activities related the centenary of the disater. It was SO popular and educationally rich we continued with research with this year’s Grade Three (We called it Titanic 2 the sequel!)

Here is our collected research on the Titanic. (This is the non-webcam version to preserve the safety of the students.)
titanic screenshot

I also asked our Grade Five students to create a short “how-to” project using Voice Thread to show their expertise on a topic. My other goal was for them to familiarize themselves with the interface prior to a major research project later in the term.

Here was my Introductory Voice Thread.

Here is an example from one of the students. (Again, I disabled all the webcam clips but hopefully, this will provide some ideas of our progress so far…)
More formal projects were to follow. This year students are studying Ancient China.

Commenting in VT

Commenting is probably the most important feature in VT to transform traditional one-way multimedia presentations into interactive and collaborative research presentations. Users can add a comment by typing, recorded audio, uploaded audio or record using a webcam. With my Grade 5’s, I asked them to create and upload a slide using PowerPoint for students to provide feedback. I also included commenting as part of my rubric to encourage them to make positive contributions to the ideas of others. (see below) I like Tony Wagner’s ideas on this. He provide these suggestions for peer editing “Be kind, be specific, be helpful and give steps” from his The Global Achievement Gap book.

Other resources and tips for using VT

1. Use Avatars for their identities

Ask students to add a cartoon representation of themselves. It provides a personal touch to your projects without giving away any privacy.

mrc.2
Here is a quick list of websites on creating an Avatar.

1. Bitstrips for School (need an account) 2. Lego 3. Diary of a Wimpy Kid 4. The Simpsons 5. Nintendo Mii

2. Upload Power Point slides

The page templates are the perfect size and are excellent for title pages, bibliographies and collages of pictures. When viewing VT’s in the presentation, the hourglass option allows users to zoom in. Perfect for collage but try to use high res. photos.

3. Use high resolution pictures 

This depends on your audience but expect to use photos at 800 x 600 pixels minimum. You can display the project in a small window but fullscreen is the best. (Go big or go home as the saying goes.)

4. Use identities in creative ways

Students came up with creative uses which were amazing including using different identifities for different character or “experts” in their project. i.e. Now let’s hear from Confucius talk about…) or having a quiz on a page with 2 identifities to represent a sound effect for “right” and another sound for “wrong”.

5. Create a feedback slide

After the projects and presentations, students were encouraged to leave a helpful comment on a specific page in their Voice Thread.
vt dog feedback

Overall, Voice Thread performed very well in a variety of situations (class, lab, groups, pairs, whole class teaching etc.) and with various devices (desktop, laptop, smartphone and tablet.) The free app and account make it an essential addition to a teacher’s smartphone (only IPhone or IPad currently) for recording student learning, progress, ideas and collaborations. Our language teachers really loved this tool as they could easily share audio recording and use devices to record student progress for evaluation.

Further Questions

How is this software being used to enhance learning and 21st Century skills?

Prior to using Voice Thread, students researched and wrote for the teacher as the primary audience. With VT, students created a vibrant record of inquiries, questions and learning. The best moments occured when students posed questions about the topics without prompting and the other students responded. This record of facts, opinions and conversations was dynamic and could then be shared to a wider audience within school community including students, parents and teacher through our LMS (Blackboard).

What steps did use to protect the identity of students in this online digital tools?
Voice Thread encourages students to upload a picture to represent themselves when commenting. Instead of a photo, students were asked to create an avatar as way to identify themselves withour giving up any privacy. See my above example from Bitstrips but there are many fun options for students to create safe avatars. (see above)

Next Steps

Consider using he same Titanic presentation with comments for the next year’s group so that students can build upon the knowledge gained from the prior year’s students. However, I’m wondering is that is too much pressure on students to come up with new ideas? Perhaps a new topic would be better choice…

Using Digital Passport with Grade 3 and 4

dp finished sample screen
What is Digital Passport?

Digital Passport is a web resource for students from Grade Three to Five to learn technology skills and and learn digital citizenship. The site includes six areas in digital citizenship with videos, lessons plans, assessment tools and fun, kid-friendly activities. The topics include password management, protecting privacy, preventing cyber-bullying, safe searches on the internet and respecting the creativity and work of others. It is also free(!) and is easily incorporated in schools that follow the ISTE NETS-S standards and supports the comprehensive Digital Citizenship curriculum offered by the Common Sense Media.

How did you use DP in the classroom?

I started each class by gathering students on the carpet to review one idea or concept i.e. creating strong passwords. I also played a short introductory video clip followed by a brief discussion to address any questions or concerns. The video clips were great because they featured kids about the same age or a little bit older. After the instructions were clear, students then completed a related game on the computer. In the Educator Materials section of the DP site, there were additional multimedia resources helpful to both our discussions and activities. As students completed activities, they earned badges and gave themselves a checkmark on wall chart. This badges and checklist were great motivators and they not only loved checked off activities completed in class but were also eager to share when they earned badges at home.

dp sign up2
How did you assess their learning?

The site allows you to create classes and provide each student access with a username and password. The advantage of creating individual accounts at this site is that you can collect and save data on their progress. You can access this information individually or as a whole group to get an overall idea of the class’s mastery and understanding of specific topics. For example, I discovered that students scored the lowest on their keyword and search skills which gave me a chance to address this through follow-up activities and discussions. I often used the individual results to reward high scores with stars on the wall chart or encourage the students to revisit areas and activities with a lower score. However, in the end, I decided not to use their score in the game as part of my mark breakdown (i.e on a report). I treated their progress like a pre-test (i.e. assessment AS learning) and followed up the unit with a “clicker” quiz as my assessment OF learning strategy. Ultimately, the most rewarding discussions (and assessment) occurred when I circulated the class as students completed assessments. Giving out certificates was fun too!

Reflections

After completing the unit with the Grade Three and Four students, I would definitely want to use this resource again as it prompted many excellent discussions and teachable moments. We often have the perception that this generation of students are really tech savvy and technology comes very natural to them. However, I believe that is mostly true about their own technology and interests. This resource was useful in our digital citizenship activities because it challenged their thoughts, ideas and experiences with realistic “what- if” scernarios. In class, I enjoyed many teachable moments where I could offer advice reinforced by the videos and activities to help them make excellent choices when online. Overall, Digital Passport is a useful resource for teaching and exploring digital citizenship questions with Grade 3 and 4. However, completing the games is not guarantee of mastery. Activities from the “expert zone” (another area of site), other resources like Brain Pop, media smarts, Netkidz and Cybercafe provide and much discussion, questioning and modelling are an excellent approach to covering this topic comprehensively.

Any suggestions or improvements?

More activities would be great. Topics that might benefit from expansion might be media awareness (i.e protecting against advertisers), creating a good balance on-line and off-activities, and effective communication (i.e when best to text, email F2F etc.). Also a version for Grade 6 to 8 with particular emphasis on mobile devices and the benefiits and risks of social media would be helpful. I understand that an iOS version is also on the way which is great too.

My reflective questions and next steps

How do I help teachers promote digital citizenship across different areas of the curriculum?
What is the best way to support parents to find technology safely and effectively at home?
Post to my blog my comprehensive list of digital citizenship resources for the Grades taught

Why “Flipteaching” complements Scratch programming

ScratchCat-Large

What is Scratch?

Scratch is a free, visual and kid-friendly programming language where anyone can create fun projects and computer programs. Students snap blocks together (think Lego) to move and/or modify objects, sprites and backgrounds. Pressing the flag runs the program and the fun (or de-bugging) begins!

Why are you using Scratch in your class?

My first experience with Scratch was at the 2008 ECOO conference in Richmond Hill where I heard MIT Professor and pioneer of Lego Mindstorms, Mitch Resnick demonstrate his new Scratch software in a keynote presentation. (His TED talk is below.) I had been teaching programming in my Grade Four and Five Technology classes with other tools but instantly liked the user-friendly Scratch interface. It seemed perfect for beginners but also included more advanced programming ideas like loops and broadcasting. What made Scratch even more interesting to me was the vibrant database of projects shared by authors, ready to be “re-mixed” and “re-imagined” around the globe. I felt that students of any ability could explore Scratch projects, acknowledge their source and remix them. I strategized that their experiences in class would be an excellent “jumping off” point for future programming and tinkering. (This has proved to be true but not surprising with this generation of 21st century learners and tinkers!)

How did a “flipped” approach benefit your students?

This unit was perfect for “flipping” because all the students had different levels of experience in programming. Students were asked to prepare for class by watching videos on my YouTube playlist or our LMS (Blackboard) and then be prepared to create in lessons. Some were content to copy a program from a “recipe” handout with little modifications. Others opted to “re-mix” the program of others while some were keen to create and innovate on the own. I personally felt that ALL these approaches had merit and therefore, decided quickly that I would keep “whole class teaching moments” to minimum (I’m sure the kids didn’t mind that much!) Beyond the usual class management and directing students to all the resources available them, (see below) most classes were dedicated to students working on a personal or collaborative projects.

What resources did you provide for students?
Video Tutorials from the Scratch website – quick projects to help students get started
My YouTube playlist – a collection of instructional videos from easy to more advanced (and fun! Pac-Man anyone?) Student’s contributed with ideas and suggestions for the playlist so I could “whitelist” for use at school. (We use YouTube Edu.) Students often partnered up with one student playing, rewinding and pausing the YouTube clip while the other copied the programming technique in Scratch.
A collection of Programming “recipes” were offered as printouts
Various displays and posters
scratchdisplay1 scratch2

How did you assess their learning?

Assessment FOR learning – Some excellent screencasts and short tasks were used after a few classes to inform future lessons and planning. (sample) Designed by Colin Meltzer
Assessment AS learning – Handout for students provided near the end of the unit to reflect and share their best project.
Assessment OF learning – Ten question quiz using Senteo clickers to test for basic fluency.

Next steps and questions for further study

How will an update to the web-based Scratch 2.0 affect lessons and projects?
Should students present and share their programs to audience beyond peers? younger students?
Are there any new resources, recipes and approaches I can use with this unit?
How can I expand Scratch and other programming opportunities in Grade 5 and 6?

Video resources for further research

What is Scratch?

Mitch Resnik’s TED talk – Let’s teach kids to code

Other resources and helpful articles
Scratch website
ScratchEd – sign up is worth it for learning resources, how-to guides and connecting with other educators and professionals
Wes Fryer’s Blog post – Introducing 4th and 5th Graders to Scratch Software Possibilities
Erin Klein’s Blog post – Computer Coding for Kids!
Michael’s Badger Blog post – Scratch Beginner’s Guide – used a few of the questions for assessment ideas

Overall, this programming unit is a popular one with the Grade 4 students in my ICT classes as it is fun, challenging, collaborative, creative, student-centered and perfect for a flip-teach approach as students have unique interests and levels of programming experiences. I look forward to learning new ideas and programs from others but most especially the students.

Level Up your Typing: a game-based approach to keyboarding for elementary students

Untitled picture
Why teach keyboarding?

Our students today have a variety of input devices (touch, stylus, voice?) but I still find that the QWERTY keyboard is the fastest and easiest input device. (I often feel pretty self-conscious talking to the computer (or tablet, sorry Siri!) when not alone, perhaps that is just me:) In my experience, writing recognition software is still clumsy and more miss than hit with emerging handwriting skills. Therefore, I find that the keyboarding remains the most reliable input device and  a significant part of a good ICT curriculum for elementary students in 2013.

When do I start introducing keyboarding to children?

Starting in the middle of Grade 2 or early Grade 3 (aged 7 or 8) seemed to be the best time  to introduce formal keyboarding  as most students progress toward longer forms of writing. Some students might be ready earlier but in my experience, a significant majority, if not all, demonstrated the necessary dexterity and readiness for more formal typing lessons by the middle of Grade 2. I found this article from Lisa Nielson very useful and comprehensive on this topic.

“Can I level up, please!” Or How I “gamified” keyboarding lessons.

Introducing keyboarding to our students in Grade 2 is rarely a tough sell as they are keen to emulate older students or adults in their lives. However, typing, like most skills, requires dedication, encouragement and practice. For these reasons, I decided to experiment with a “games-based approach” to see if it would help our junior students remain motivated during the long road from novice to fluency.  I decided to start with students in Grade 4, 5 and 6 and created a scale of achievement where students “level up”  after achieving a specific WPM (words per minute) and accuracy (95%). As they “levelled up”, I also offered them the opportunity to “unlock” access to a greater variety of typing games and websites during class time. I also separated the idea of the “levelling up” from academic achievement by putting emphasis on effort and improvement for these relatively novice typists as the main source for marks. i.e. A student who still remained on Level 1, might still be able to receive a “A” if they were putting forth an excellent effort. (So far, this has not happened as all students who all showed dedication found increasing success and “levelled up” their typing.)

Here is a copy of my “levelling up” scale. This is version 3.0. Any feedback is welcome.
Leveling up your Typing 2013
Leveling up your Typing
Current resources:

Mavis Beacon Teaches Typing (Grade 2 and 3 students)

mavis screenshot

Pros:

  • Lessons are clear, supportive and linear
  • Includes 3 levels (beginner, intermediate (timed lessons) and advanced)
  • Games are very student friendly and good for 7 and 8 year olds

Cons:

  • Not web based
  • Account structure is not ideal
  • Cannot customize at the beginner(i.e. skip student ahead if needed)

Custom Typing  (Grade 4 and 5 students)

customtypingscreen

Pros:

  • Two modes (self-guided and computer-guided)
  • Many differentiated resources for students
  • Excellent reporting system
  • Students can choose activities, lessons, and games and work in a non-linear fashion
  • Teacher can assign specific lessons to a students, class or specific group

Cons:

  • Students repeat the same lesson twice in the “computer-guided mode”
  • The “self-guided mode” can be overwhelming for students
  • Only four typing games
  • The “self-guided mode” could be more kid-friendly

Here are the additional typing sites that can be “unlocked” by  “levelling up” during lessons. I posted this symbaloo on our Learning Management Software (Blackboard) so they can try them at home. (Each “symbaloo” links to website for students, normally one click takes you there, but click my screenshot below to reach the “clickable” symbaloo page.)

symbaloo keyboarding sample

Recording their progress

I use two resources:

1. a simple wall chart with the student’s name, class and level. They give themselves a checkmark when they level up. Not very private(!) I realise but it is SO useful to easily keep track and monitor their progress during the hustle and bustle of keyboarding lessons in the ICT lab.

2. During keyboarding lessons, I display a Class Dojo page on the SMARTboard for them to see and reward themselves with a  +1 typing point. When reviewing, assessing and analyzing student progress, I love that Class Dojo records the date of when the point was achieved. What a great tool for reflection and analysis. “Wow, look how you achieved 2 levels in 1 month! All that time practicing in our custom typing site really paid off!”

+1 typing
Overall, the best part is that I am spending more class time celebrating student progress and achievements. A quick thumbs up, nod, high five or encouraging word from me and students seem eager to independently record their progress on a wall chart and on the SMARTboard though Class Dojo.

Conclusions

When setting up my levels, I started with 4 and had to expand to 10 within a couple of months as some of my Grade 4’s progressed quickly! Initially, most students were keen to “level up” to gain more choice of games and activities. This increased motivation made them increasingly receptive to tips and tricks to improve their speed and accuracy. Although I remained open to feedback, l found that students appreciated the clarity of the system. If they came up a little short in their speed, they almost always responded well when encouraged to try again, complete a different activity,  or to return to the typing assessment when ready.

A funny thing happened at the later levels, I was afraid that some of the students might unlock their favourite game (e.g. the popular Type Racer!) play that game regularly and then have their skills stagnate. However, once the majority of the students began to level up they seemed determined to past the assessment benchmarks. It was a complete reversal as I was now the one offering them the opportunity to play a typing game while they were more keen to complete assessments. It seemed that the process of “levelling up” gave them a tangible achievement goal and they were motivated to keep going. (I guess that is why I had to expand my levels from 4 (version 1.0) to 6 (version 2.0) to 10 (latest version 3.0).

Overall, the benchmarks seemed pretty clear and I was able to tweak my requirements to ensure that the difficulties of each level increased at a appropriate rate. Custom Typing,  Mavis Beacon and typingtest.com seemed to be pretty good resources for typing assessments although you should be aware of the ads at the typingtest.com site. (Although students seem to be too focused on their test to see them!) I hope to update and refine this approach each year. Thanks in advance for any feedback.

Questions for further study and analysis

What place does keyboarding have in the 21st Century ICT curriculum?
What age should student start to learn about keyboarding?
Should keyboarding be expanded to include tablets and mobile devices when appropriate?
How much time should we devote to keyboarding in the primary, junior and senior curriculum?
What tools or software do we need to run a successful typing programme?
Should I add/replace customtyping.com or Mavis Beacon with the web-based QWERTYtown software?

3  influencial articles and resources

Lisa Nielsen’s article-  http://theinnovativeeducator.blogspot.ca/2011/02/when-should-students-start-learning-to.html

Bryan Miller’s article tackles one of the questions for further study, introduced me to QWERTYtown and gave me another excellent perspective on this topic. http://edudemic.com/2012/11/keyboarding-or-computer-literacy-the-new-dilemma/

Keith Ferrell’s EdTech blog provided me with keyboarding resources and ideas that I shared with students. http://edtechideas.com/keyboarding-sites-for-kids/

tmtt – A quick summary of Game-Based Learning

Like it or not, digital games loom large in the lives of our 21c kids today. Most of our students and perhaps you too, received some kind of device/game/gadget over the holidays! Happy New Year BTW!) From Minecraft guides on YouTube, to interacting with their virtual pet on a DS to reading(and playing) a Dr. Seuss ebook/game on an IPad /smartphone, our kids use these devices to play, share and learn about the world. (And this is not just how I spent my break!)

GBL is an powerful tool when: used purposely to teach a topic, age appropriate, easy to start but suitably and increasingly challenging and most importantly, fun. For our Grade Four’s, our truck driving simulation called Cross Country Canada 2 is an effective (and sneaky) way to teach them Canadian geography. When keyboarding, our Grade Five students earn levels by improving their skills and when they “level up” they “unlock” new activities and challenges. Like drama and other resources, digital games can be an excellent resource to motivate, differentiate and engage a variety of learning styles and offer experiential learning through well designed games and simulations. I believe that strategically chosen games and educationally rich simulations can be a strong element of a well-rounded curriculum to target this generation.

Here is a good video as an introduction to GBL (ignore the background piano playing as it is only slightly better than mine!) and also included is an excellent comprehensive GBL resource page from Edutopia.
Let me know what you think and please feel free to share any GBL strategies and resources from your lessons. I am happy to share our current GBL resources, collaborate and search for more on your topics.

Here is a link to a prior article on how I “gamified” my ICT lessons.

Also here is a Symbaloo on Keyboarding resources, I created and posted on our LMS (Blackboard).

symbaloo keyboarding sample

*tmtt = Our two minute technology tip shared with our staff.

2 min. tech. tip – flipsnack is a cool tool to display student work

flips
As a teacher, I find that there is nothing better than sharing projects from students at the end of term or unit. Not only that, students love seeing their work published whether in a book, website or bulletin board.

One tool I love for sharing is called Flipsnack as this site allows you to create a digital flipbook from any .pdf file. You can either scan documents through our printer as a .pdf or create .pdf’s yourself (i.e. in Word save as a .pdf etc.) Their “Flipsnack” creations can then be shared by a URL or embedded in a web site, blog, wiki or LMS (like our blackboard). Also good to note that there is 15 page maximum for each “free” book. However, my work-around is to create two books for each project and display both the links.

Here is an example from a few Grade Three students.

Another example from the flipsnack team.

The other “snack tools” are excellent too. Here are links for photosnack – an online slideshow creator, filesnack – a quick and easy file sharing service and their newest tool: snack websites – for a high quality website creator. All are free and I think are well-designed.

Doing my best so you’re on the cutting edge!