The Surface and Beyond: implementing the Surface Pro 2 with junior students: Part 2 – Communicate

Phase 2 communicate
After having established our vision for the devices, I now focused on efforts to collaborate with our teachers and learning community to get ready for the implementation stage (Phase 3). We are encouraging teachers to use tablets to support a anytime, anywhere and “anybite” (i.e. 5 min.,10 min.,30 min. or ?) model for learning.

In this stage, I offered regular F2F sessions on Wednesday morning, regular correspondence though email, shared documents in Google Drive along with informal discussions and sessions. Eventually, I would love to share and connect with a significant majority of colleagues in school through social media like Twitter or Google+ but I have to go where my audience is. At the moment, our audience uses email for everything. So what did we talk about in those F2F sessions..?

Excerpt from my OneNote binder

One note phase 2

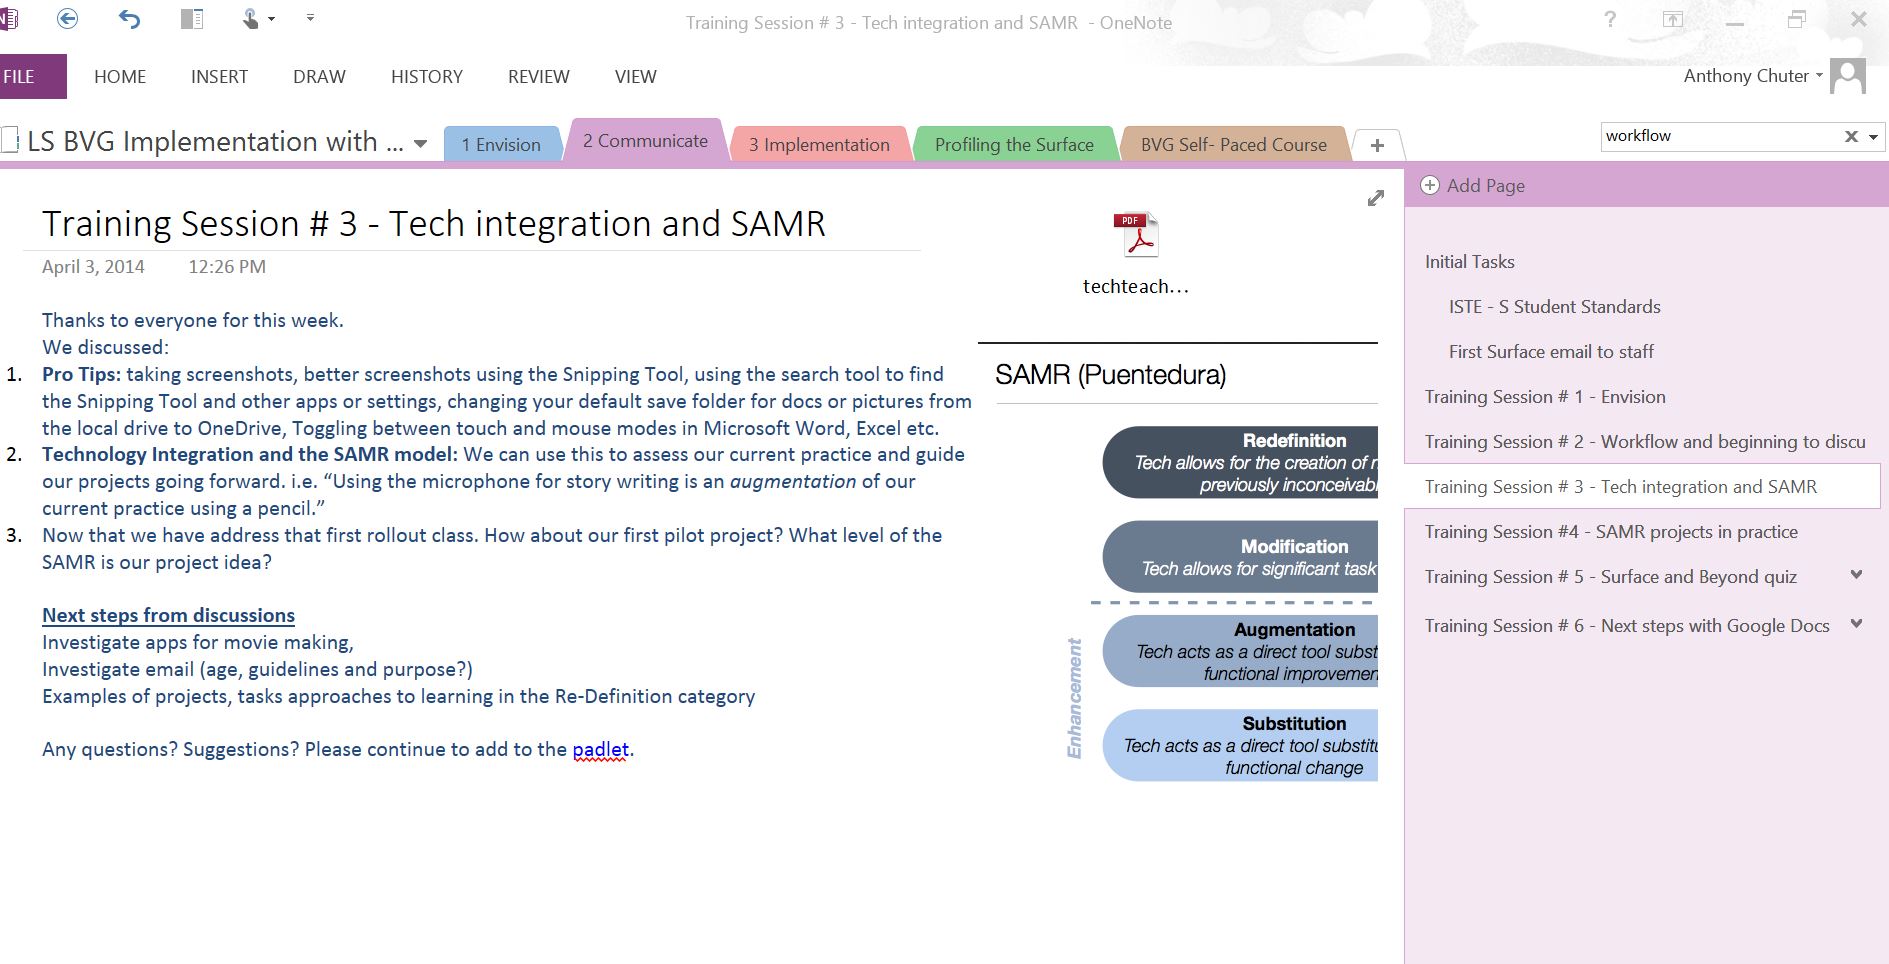
1. ISTE expectations for students

ISTE-Nets-Graphic

The ISTE standards were helpful for providing overall expectations and addressing what students should actually know about using technology in their learning. We also supplemented our discussion on the Digital Citizenship section of the NET-S with Common Sense Media resources. In addition to the ISTE standards, we obviously mapped our activities to support Provincial standards and added more specific skills to meet the expectations of each area i.e. teaching a Grade Four student to correctly cite digital images would fall under the Digital Citizenship banner.)

2. SAMR model
doi:10.3402/rlt.v22.22648

As a group we explored this model as a guide to current and future practices with technology. We saw the benefit to creating  new projects and experiences that redefine the learning experience for students leverage these devices. However, this process cannot happen overnight and perhaps it is more helpful to first define activities and current practices in the SAMR model (i.e. Typing in Word as “substitution” etc.) before moving on to new practices. In other words, we cannot quite abandon all activities that are not in the “redefinition” category but evaluate each activity on its own merits for learning. After all, some substitution activities have value for learning. Eventually, we will strive to have a significant number of redefined activities and experiences never before possible in a traditional classroom. However, we need to work progressively and incrementally with teachers to help them define and work through each stage in order to understand the learning benefits of new and exciting pedagogies that leverage technology.

3. Workflow diagram

eBackpack-workflow-full-blown
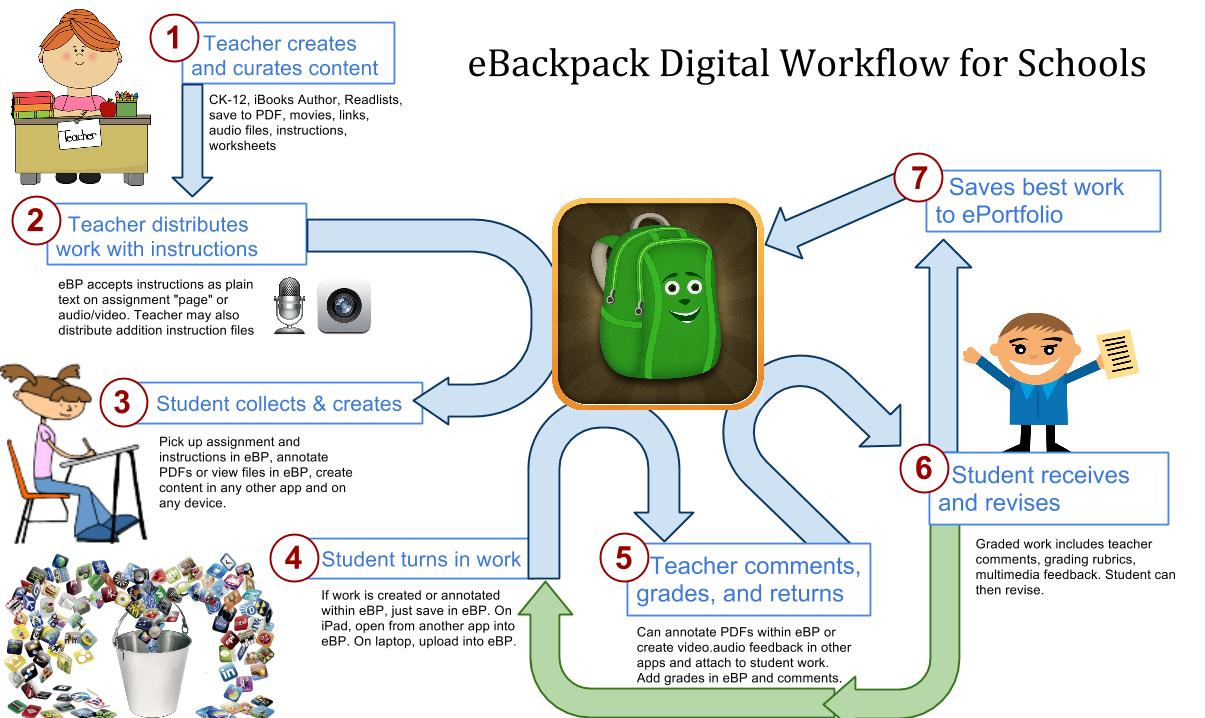
I adapted this diagram created by e-Backpack and to use with Google Drive, Blackboard (our LMS) as well as other cloud-based applications to drive our workflow with our Junior students. We found that this diagram helped us envision how the process of learning might look in a tablet environment and invited changes, suggestions and clarifications. This workflow discussion led to further discussion and training ideas on collaborating using Docs, Forms, Spreadsheets or Presentations. In addition, determining the most effective pedagogy and the application from Google  (Lucidchart (graphic organizer) (although I prefer popplet.com),  Kaizena (Voice commenting), Floor Planner and Powtoon (Animated presentation tool) will be areas for future sessions,  discussions and sharing.

4. Lots of other quick tips and resources

At the beginning of the F2F sessions, we took time to learning the in’s and outs’s of the Microsoft Surface Pro 2 and explored tips and tricks specific to Windows 8.1. For this part of the PD, I leveraging Twitter and in specific @surface  and @MicrosoftPIL for useful resources and guides.

Here is one of many example graphics that posted in our training resources.

finding your apps on surface

Reflection

What is interesting to me about this stage is that it is now ongoing and never has to end. I can provide links and resources for teachers and vice versa until we all feel comfortable sharing tips and tricks to improve student learning. Helping teachers develop a PLN using Twitter, Zite, Flipboard and other sites would be a valid next step to build our collective and shared knowledge and experience to aid student learning. (Here is a post I like that discusses one vision for “information wrangling.) For me, Zite, Flipboard and Twitter do the trick for anytime, anyplace, “anybite” (Have 2 min?) with next steps being emails to colleagues, or posting to Twitter, Delicious ( links), OneNote (articles and files) and perhaps eventually my blog at WordPress (for hopefully semi-articulate posts:))

For the next round of training and professional development, I would love to create a self-directed course on our LMS where teachers who learn best on their own and often forget (ahem) things eplore once in lessons or professional sessions. (Full disclosure – this is one of my learning styles (or I’ll call it a quirk.)

In addition, working with parents and our wider learning community is also worthy of some consideration too. (That deserves much more discussion.)

Here were some ideas I had for future sessions but I have no doubt this list will change with feedback as well as some ideas from my PLN.

  1. Recording,  collecting and assess student responses i.e. Socrative, Top Hat and Poll Everywhere
  2. Allowing students to tell stories through video i.e. Camera app, Movie Edit Touch
  3. Using tablets for personalized PD i.e Twitter and Flipboard
  4. Using OneNote to collect and assess student learning
  5. Using OneNote (Windows 8 version) for daily lesson plans and materials (stylus at the ready!)
  6. Live sharing of content and learning using NearPod
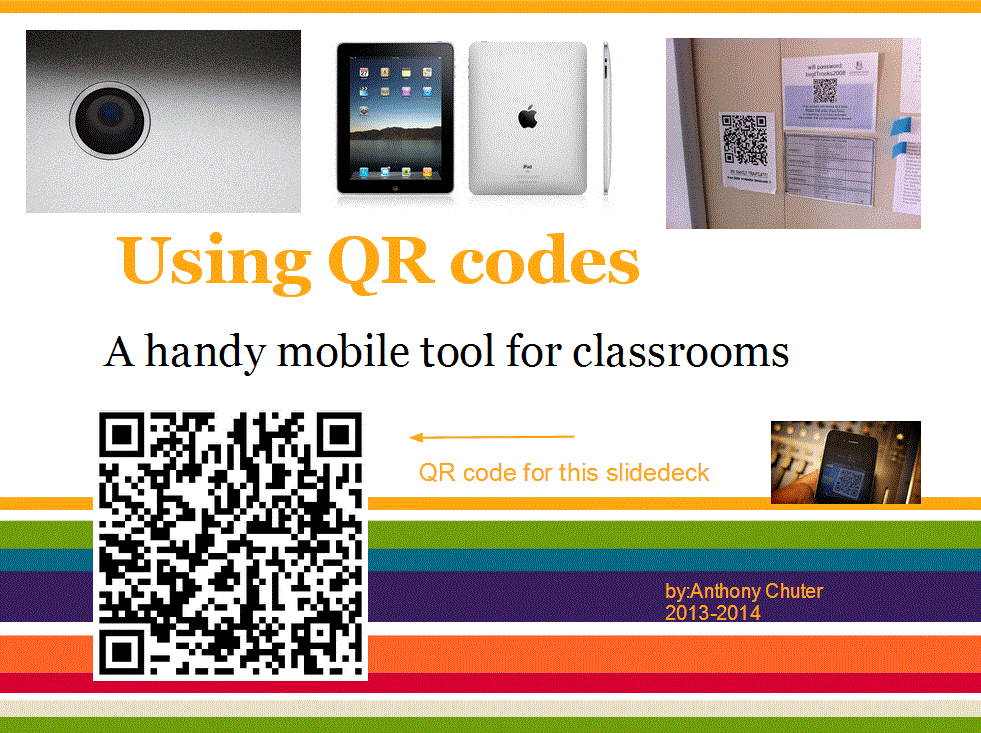
  7. Leveraging QR codes for students to explore and learn i.e. QR scavenger hunt
  8. Blogging and microblogging with students to share and connect i.e. KidBlog, Scrawlar
  9. Creating teacher-made screencasts using the Surface for use before, during and after class i.e.”Flipteaching”
  10. Collaborative writing using Google Docs (Our “workflow” diagram in action, voice comments etc.)
  11. Using Google Forms to create quizzes, assessments and activities for students

Next up, Stage 3 implementation with the students.

The Surface and Beyond: implementing the Surface Pro 2 with junior students: Part 1 – Envision

surface picWith not much in the way of web-based research materials specific to the Surface (breaking new ground!), I concentrated my efforts on exploring tablet (mostly iPad) and notebook computer rollouts. Since the Surface Pro 2 is a hybrid device that is both a powerful computer (Windows 8,  i5 processor, solid state drive) and also leverages tablet capabilities (i.e. touchscreen, camera, apps etc.) I thought that this seemed a good approach for research and implementation.

I quickly realized this process (as suspected) needed to be team effort between a number of parties (students, leaders in learning, teachers, administrators, technical staff to be successful.) However, I felt strongly that I wanted to emphasize this initiative as a “learning” rather than a “technology” initiative with our students, with student learning in specific, at its heart or center. This approach helped “win over” the “hearts and minds” of teachers potentially suspicious of this disruptive technology in their successful classrooms.

This blog post by Sam Gliksman also provided a number of critical questions to inform and guide discussions about tablet implementation (iPad yes, but many ideas were very applicable to any tablet). I really like how the questions are categorized and this organization made it easy for this nosy and overly keen Technology teacher to initiate discussions and conversations with respected parties. Thankfully, a number of these questions were already answered but some were not. In particular, the vision question was ripe for discussion in order to incorporate the perspectives of all but maintaining a clear, simple, transparent and persuasive vision when asked by any and all in our learning community.

As far as structuring our tablet implementation, the Common Sense media offered an excellent model for 1:1 initiatives that could easily be adapted to our shared model of shared carts between classes. Here is a graphic from the site with a direct link.

3 stages

Here is screenshot from my Notes in Microsoft OneNote on the Envision stage.
Screen shot prep

Next up in Part 2…exploring the Communicate stage with F2F sessions with teachers, leveraging PLN’s and providing materials for self-directed learning for teachers with ultimate goal of getting this powerful devices in the hands of our capable students.

Leadership and Technology: becoming a transformational leader

I learned much in my Leadership and Technology course. (So busy to even update this blog recently.) However, one of our tasks was to create a learning log of my journey which is available at http://arclearninglog5103g.wordpress.com/ which allowed to me exercise my writing and blogging instincts on a new page.  (So hopefully, I am not totally out of practice!!!) My main takeaway was to apply new learning in my role as a technology leader in my school. To me a transformational leader requires vision, collaborative skills, creativity, supported by well founded research and interested in good pedagogy that improves learning.

I also added the text and some of the elements of my Learning Log to my professional blog after some feedback from colleagues. Next up, I begin a Technology and the Curriculum class in May.
highlights here

Thanks!

Going “QR Qrazy” with QR codes in our iPad BYOD middle school environment

One look at the walls and displays in our new iPad BYOD  middle school demonstrates  some exciting changes to our school environment. Displays on walls and hallways are now “alive” , as teachers use QR codes to create scavenger hunts, links to videos, documents, sites, student work even text messages. The walls are well and truly interactive which makes sense as each student has a tablet (and/or phone) in their pocket ready to scan.
Here is are some examples.
IMG_4590 edit    IMG_4588     IMG_4592 edit    
IMG_4589 edit     IMG_4591  qr code slidedeck

1. Schedules 2. Important Links 3. Student created QR code 4. wifi information. 5. Student work 6. Slidedeck for teachers

The 3rd  is my favourite. Students often decorate the lockers of their friends on birthdays. This group of friends actually covered their locker in QR codes with birthday wishes and messages which appeals to my both my geeky and sentimental side. A typical sign of how millennials seamlessly use and weave technology in their personal and social lives.

What is a QR code?

A QR is a scannable barcode that can

  • take you to a website
  • open an online file
  • link to a video
  • generate a text message.

At the beginning of the year, I had the opportunity to lead our teachers in a hands-on perhaps “scan-on” workshop where we discussed and explored the possibilities of using QR codes in class. Tony Vincent’s Learning in Hand website and Twitter feed proved to be a valuable source of resources and ideas for using this technology to aid and support students, parents, teachers and other members of our learning community.

Here is Tony Vincent’s excellent introductory video.

Scanning QR codes

Using these apps you can turn your smartphone or tablet (or even computer) camera into a programmable scanner. To effectively use QR codes in the class, you will need to create QR codes and provide resources for students, colleagues to read or scan them.
I-nigma QR app – Free
Scan – $1.99
More examples are listed here on this excellent blog site.

Three QR code creation sites on computer

http://qrcode.kaywa.com/
http://goqr.me/
https://www.the-qrcode-generator.com/

I usually create QR codes and use them to share, print or insert in a variety of digital or print materials. They can be copied and pasted like any digital image.

Further possibilities for QR codes
I love this idea of creating a QR code voice message. Do your students ever mention that they hear your voice at night? Now you can really make that happen.  Create a message or instructions to students using this website. and put in their handouts, notes or even textbooks (cue evil laugh) http://qrvoice.net/
How about student book reviews as a number of librarians have began putting QR codes in books so that students can hear from peers while browsing.

QR code scavenger hunts are also fun too. Here is an example at http://www.classtools.net/QR 
  
Useful QR code articles and source material
Vicky Davis’s awesome QR code classroom implementation guide
Tracy’s Watanabe iPad blog – some great ideas and resources for QR coding in the class.
Monica Burn’s article from Edutopia – 5 reasons I use QR codes in the classroom
Mr. Avery’s “Going Rate” Math QR code scavenger hunt
Richard Byrne’s review of QR Voice – lots of other good QR resources below the article too
Jackie Gerstein’s Mobile learning activities
Tony Vincent’s Learning in Hand blog – http://learninginhand.com/
Online QR creating with Kaywa Code Generator – using this on all my devices
Stylish QR codes with Visual Lead
Janiet O’Hara’s site on QR codes – love tagmydoc and visual lead
YouTube QR code generator

And here is the QR code for the site. Coming to a wall or screen near you!

Dec. 9th-13th Computer Science Week – Resources for The Hour of Code and beyond

Each day this week, we have been coding with our Junior and Senior students to celebrate Computer Science week and the Hour of Code. Each day I have been tweeting some thoughts, ideas and resources on this topic. —- >

Here are some resources I have found useful to explore and share programming and coding with students.

Why learn Computer Science?

 Kodable’s 5 reasons to teach kids to code  
5 reasons to code
Here is a very cool resume programmed in the style in Super Mario World by Robbie Leonardi
cool programming resume
Google celebrates Comp. Sci. week with a Google Doodle on Grace Hopper
unnamgrace hopper

The ScratchEd has produced an activity to celebrate this week. Who wants to send a Holiday card this season when you can send a holiday code instead?!

HOC studios
Here is the link.

Finally, here is a link to my programming page with ideas for using Scratch in the classroom,  some articles and resources for coding on tablets and/or computers. I also outline 4 key concepts for introducing programming through tools like Scratch. Having a great Comp. Sci. week so far. My highlight this week was on Monday when a very quiet and very new Grade 5 student who burst into my class during his playground keen to show his progress in Scratch despite ONLY a 10 minute introduction the prior morning before he had to leave for his basketball game. It was a teaching moment I won’t forget!

Happy Coding!

~Anthony

Countdown to #ecco13

Busy times at the beginning of the school year (new classes in a new division+new responsibilities+coaching+AQ courses (not to mention 2 little kids and a very supportive family) = busy times! However, looking forward to attending #ecoo13 seeing some familiar faces and sharing my experiences with programming Scratch. Here is my link to my conference page on Lanyrd. Here is a link to my Scratch resource page. Visit again for upcoming posts on our iPad implementation, Google Apps for Education implementation, QR codes craziness our and First Lego League experiences too!

Here is my slidedeck on Scratch.

~Anthony

Programming to think on the Internet of Things

My daughter and I exploring retro games at the Game On exhibit at the Ontario Science Centre.
s c64
Walking around the exhibit, I started thinking about the impact of programming on my life. Consider that we now have a well established “internet of information” where the majority of programming takes place on a specialized device (computer) and are beginning to experience an additional phase of programming on an increasing number of connected everyday devices (through wifi, Bluetooth etc.) AKA the internet of things. Who is going to have the expertise (and time) to connect and program all these new devices in the coming days?!

My first programming memory starts with my Commodore 64 back in the day (ok I’ll own up, early ’80’s). Many an hour (or four+) was spent tinkering and playing with the keyboard, basic OS and removable media of that day (cassette tapes and then floppy disks). This machine helped me learn to program in Basic, Logo and of course play (and manage) many applications and of course many, many games with friends. It was often SO slow that complete games of hockey, baseball, meals or general socializing could take place (while waiting for games like Jumpman, Grand Prix or California Games (among many other good and not so good games) to actually load! In retrospect, I think perhaps more time was spent talking about, finding, saving and sharing than actually playing them…but the chase is sometimes the best part. However, this slow unreliable but well-loved computer taught me much about programming and computer operations like keyboarding and even web browsing through a basic modem (remember the BBS anyone). In this stage, programming was confined to speciality devices like computers and its interest was confined to us geeky kids. (Although, I’ll bet that all the best tech-savvy individuals you know from Generation X group probably have a some history with an Apple III, C-64, VIC-20 or even Amiga etc. but I digress.  (For fun here is a list of the 100 most popular C-64 games.)

My next programming memory takes place in Cambridge in the United Kingdom sometime in 1998. My then savvy girlfriend, now my beloved wife told me that the engineering department was working with AT&T to create a programmable fridge. The fridge would record the contents inside through the barcode  and presumably send the results to someone’s computer. Sounded cool but this was still outside the daily experience of the everyday (especially us on an starving student budget). Although it was early days I would characterize this as a key moment in the “internet of things” as an everyday object (fridge) becomes “smart” enough to connect with another speciality device (computer).

However, the world of mobile devices is where connected devices become quite handy and a ready technology for the everyday. With an increasing amount of devices on the network our smartphones become our “remote control” for the home and potentially the world. In this new phase of programming, the “smart” fridge has increasing functionality, presumably as an app for our phones, making a list so we can check it twice, before we receive a message geo located and timed when near the local grocery store. We can control objects through specific settings and have those objects are set up to predict our needs. (i.e. think scheduled recordings on a PVR but for every object.) This article from Wired’s June 2013 issue called “Welcome to the Programmable World” by Bill Wasik probably best describes up the benefits and challenges in this new phase of programming.

In this new world of “smart” objects, programming skills like designing, debugging and re-mixing are going to become increasing mainstream. In October at ECCO 2013, I have been asked to present about my work with a visual programming language called Scratch in my technology classes. My junior students love Scratch as it is a digital extension of playing, tinkering and creating. I look forward to sharing my experiences, successes and resources with programming. (Here is a link to my Scratch resource page.) The UK education system has already adopted programming as a key revision of their ICT curriculum in 2014. The United States also has a strong movement to champion programming represented at code.org. So I feel in good company support the need for programming in the already busy elementary curriculum.

I look forward to chatting about my Adventures with Scratch in the classroom and especially the increasing interaction between digital and physical objects. (My Makey Makey kit is in the mail and I look forward to exploring this intersection of the digital and physical in the new school year.

Here is a link to my presentation at ECCO 2013. I look forward to sharing, discussing and evaluating new and exciting pedagogy with technology.
ARC BIT_LG_schpxy

Here is a cool info graphic on the Internet of Things with a link back to the original source.Internet of things

Mobiles in the 1 device classroom and beyond

Everywhere you look mobiles are having a dramatic impact on the world around us. Ask yourself…how have you used your “phone” in the last week? I sure your answers are varied and will amaze you.

But what about the classroom…teachers are realizing the potential for the anyplace, anywhere, anytime aspect of mobile devices as an powerful resource for learning, creating and sharing.

“In addition, since the fourth quarter of 2010, smartphone and tablet sales have exceeded PC sales – and the growth trends continue to favor these newer devices. Mobile devices now account for 13% of global Internet traffic – and rising.”

Source: http://readwrite.com/2013/05/13/mobile-is-taking-over-the-world

Here are 3 examples of sample activities for teachers in the one device classroom.

1. Use your phone to record (i.e. oral assessments, collaborations and for multimedia projects) I use Evernote, VoiceThread and an app called  Recorder Pro)
2. Take pictures as Assessment as Learning (i.e. spreadsheet with check boxes or take photos for reviewing, sequencing and reflecting)
3. Access and edit critical files (schedules, team lists, check lists, PDFs )through apps like Skydrive, Dropbox and Google Drive (in the last one, up to 50 people can collaborate on one doc, spreadsheet or presentation)

My examples are from the Apple App Store but if that specific app is not available, there are many similar alternatives in other app stores (most are free too!)

With mobile technology (phones and tablets), learning is now anytime and the “classroom” anywhere. Many people are using apps to learn, create, communicate and share in new and exciting ways. However, I believe it is a mistake to focus on the apps themselves. Instead, perhaps the focus should be on how mobile tech. creates new and engaging learning opportunities for ourselves and students. Dr. Puentedura’s research examines how we use the technology to transform and redefine learning experiences for students. See my blog post on Puentedura’s SAMR model which has been a great influence on my integrated approach to educational technology. How can we use this technology to provide new pedagogies to prepare them for the future? As for apps…as the iPad ad says: “there is an app for that!”

Here are some learning opportunities for mobile devices and some example apps.

  1. Read (and discuss) Professional Development articles on your subject or interest (i.e. Zite, Flipboard, Twitter…)
  2. Collect and curate articles, graphics, videos… for sharing (i.e. Delicious, Diigo, Pinterest…)
  3. Scan, display and analyze student work (i.e. HD Scanner, Camera app,)
  4. Create a digital notebook of student work for assessment and sharing (i.e. Evernote, Good Reader)
  5. Transform text into audio (i.e. Qwiki, Speak! or adjust assessability settings in an iPad)
  6. Create a collaborative digital poster (i.e. Padlet, Lino it)
  7. Create a collaborative graphic organizer (i.e. Popplet)
  8. Create, edit and share a slideshow or movie (i.e. iMovie, VoiceThread, Animoto)
  9. Connect your class with experts, teachers  or other classes (i.e. Google Hangouts, Skype etc.)
  10. Write, record, sketch your notes (i.e. Penultimate, Notability)
  11. Compute complex calculations (i.e. Calculator, Numbers etc.)
  12. Organize, share and manage your school calendar (i.e. ITeacher Book, Google Calendars etc.)
  13. Quickly contact groups of students or teachers through text messaging (i.e.  Remind 101)
  14. Make sketches to teach and share (i.e. Educreations, Explain Everything, Show Me)
  15. Sign or annotate and return a .pdf without printing (i.e. Acrobat Reader, Good Reader)

This is list is far from exhaustive and I hope not too overwhelming.

Hopefully, you have had at least one takeaway tip. I have enjoyed sharing my research and ideas from colleagues to help you and your students. Thanks for reading the final tip before summer. (Yippee!)

Anthony

My Twitter handle for questions and further discussion – @anthonychuter
F
or further discussion of this topic check out my group project and research on mobile technology in the class.

9 YouTube tips and tricks for teachers

These tips are great for supplementing your own flipped videos uploaded to YouTube or other videos you use in class i.e. Khan Academy.

  1. Tubechop – This site allows you to choose a specific start and end point for a YouTube clip. This is great for reviewing parts of videos in lessons, differentiating clips for students and editing longer videos. I use a one minute per grade guideline (i.e. Grade 5 students should not watch clips of more than 5 minutes) in order to keep instructions short, sweet and specific.
  2. ViewPure– All the great YouTube video goodness minus all the ads and links. I have it on my Internet Explorer+Firefox toolbars for easy use.
  3. Hyperlink to specific point in a video
    1. “It’s possible to link directly to a specific point in a YouTube video. Play the video, and keep an eye on the white blob that moves along the timeline below the video, (the thing you drag to move forwards/back through the video). When you get to the point in the video that you want to jump to, right click on the blob and choose “copy video URL at current time”.

If you now use this link as a hyperlink in your IWB software or PowerPoint, the video will start playing at the point that you chose.”

Number 3 was from this site

4. Video Notes – a very useful web app that allows you to create and save notes with a YouTube clip. Perfect for teachers and students in the flipped class and saves nicely with Google Drive too. Here’s the URL since it is not a top link from a web search. http://www.videonot.es/

5. Tubesnack – Create a playlist of YouTube videos. Great for a collection of clips on a particular theme or topic. Share by URL or embed in a website or LMS like Blackboard

6. YouTube to .mp3 converter – Sometimes you just need the audio of a particular clip, this site helps you convert your video clip into audio. Shout out to language and music teachers on this one but all teachers will benefit from another nice handy tool for YouTube.

7. Watch2gether

It ,as its name implies , allows its users to watch YouTube videos simultaneously. You can now share and enjoy YouTube videos with your colleagues (and students) in real time on their devices.

8. EmbedPlus

EmbedPlus enables its users to start their videos at a chosen time , skip self-defined chapters, and add captions and annotations

9. Tubesnack – Enables you to build a YouTube playlist of videos on particular theme or topic.

This is my list of sites that I use frequently in my classroom. Here are two excellent blog posts that I used for reference and contain similar and additional links.

From Danny Nicholson’s Whiteboard Blog

From Med Kharbach’s Educational Technology and Mobile Learning Blog

My top 5 Avatar creation sites for students

Can you match the avatar style with the websites below?

mrc.2voki sampledoppleacmiiacmrc lego head

Here are my top 5 favourite (Flash-based) websites for creating student avatars. Creating avatars allows students to include personal digital representations of themselves for online or in digital materials without relinquishing any privacy. Plus they are fun to create and a kid-friendly addition to any project, presentation or learning material.
  1. Nintendo Wii – Who doesn’t love creating a Mii!
  2. Lego – A class favourite but try “snipping” only the heads and shoulders to avoid “lightsabers” and other Stars Wars© paraphernalia
  3. Manga – perhaps better suited for students 11+
  4. Bitstrips or BitstripsforSchools.com – Now a Facebook app but a popular choice as all Ontario students have freeaccess to Bitstrips for Schools.
  5. Dopple Me –  Another favourite!

+1 Bonus – Voki – Why not add your voice to an avatar too!

It should come as no surprise that students love creating them and they are great as signatures for wikis, blogs, documents, websites etc. I find them especially useful in Voice Thread or other online sites or games that offer the option to upload a picture. Remember that blank is always an option but a cartoon avatar is fun and safer than a photo. Use the “snipping tool” or another screenshot tool to take a .jpg (or other picture file) of your avatar to share in other sites.  I keep a .jpgs of cartoon avatars in my Dropbox account ready to be used in projects or uploaded to sites. Now if only those the avatar creation sites for The Simpsons and Diary of a Wimpy Kid start working again…

P.S. Did you guess them all? Perhaps you will have to visit each site to find the answer.  While you are there, go ahead and create+save an avatar of yourself too! Consider it your professional development for the day! 🙂 Below is an avatar of one sad little lad in our house with the current states of the TFC, the Toronto Maple Leafs and Blue Jays this year! “Maybe they will win next year Dad!” I am crossing my fingers for him!
sad matty

Cheers,

Anthony