Level Up your Typing: a game-based approach to keyboarding for elementary students

Untitled picture
Why teach keyboarding?

Our students today have a variety of input devices (touch, stylus, voice?) but I still find that the QWERTY keyboard is the fastest and easiest input device. (I often feel pretty self-conscious talking to the computer (or tablet, sorry Siri!) when not alone, perhaps that is just me:) In my experience, writing recognition software is still clumsy and more miss than hit with emerging handwriting skills. Therefore, I find that the keyboarding remains the most reliable input device and  a significant part of a good ICT curriculum for elementary students in 2013.

When do I start introducing keyboarding to children?

Starting in the middle of Grade 2 or early Grade 3 (aged 7 or 8) seemed to be the best time  to introduce formal keyboarding  as most students progress toward longer forms of writing. Some students might be ready earlier but in my experience, a significant majority, if not all, demonstrated the necessary dexterity and readiness for more formal typing lessons by the middle of Grade 2. I found this article from Lisa Nielson very useful and comprehensive on this topic.

“Can I level up, please!” Or How I “gamified” keyboarding lessons.

Introducing keyboarding to our students in Grade 2 is rarely a tough sell as they are keen to emulate older students or adults in their lives. However, typing, like most skills, requires dedication, encouragement and practice. For these reasons, I decided to experiment with a “games-based approach” to see if it would help our junior students remain motivated during the long road from novice to fluency.  I decided to start with students in Grade 4, 5 and 6 and created a scale of achievement where students “level up”  after achieving a specific WPM (words per minute) and accuracy (95%). As they “levelled up”, I also offered them the opportunity to “unlock” access to a greater variety of typing games and websites during class time. I also separated the idea of the “levelling up” from academic achievement by putting emphasis on effort and improvement for these relatively novice typists as the main source for marks. i.e. A student who still remained on Level 1, might still be able to receive a “A” if they were putting forth an excellent effort. (So far, this has not happened as all students who all showed dedication found increasing success and “levelled up” their typing.)

Here is a copy of my “levelling up” scale. This is version 3.0. Any feedback is welcome.
Leveling up your Typing 2013
Leveling up your Typing
Current resources:

Mavis Beacon Teaches Typing (Grade 2 and 3 students)

mavis screenshot

Pros:

  • Lessons are clear, supportive and linear
  • Includes 3 levels (beginner, intermediate (timed lessons) and advanced)
  • Games are very student friendly and good for 7 and 8 year olds

Cons:

  • Not web based
  • Account structure is not ideal
  • Cannot customize at the beginner(i.e. skip student ahead if needed)

Custom Typing  (Grade 4 and 5 students)
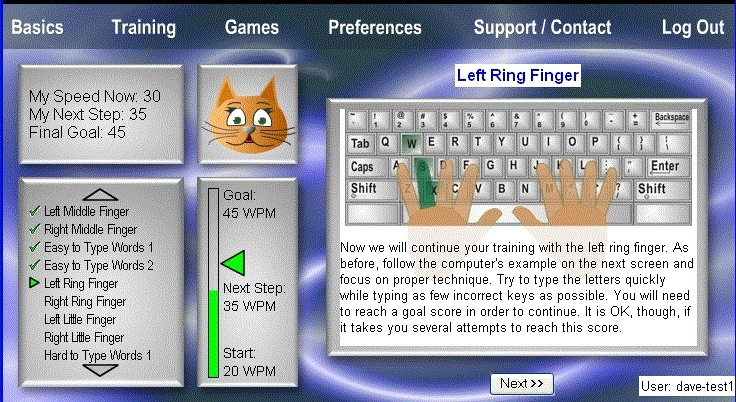
customtypingscreen

Pros:

  • Two modes (self-guided and computer-guided)
  • Many differentiated resources for students
  • Excellent reporting system
  • Students can choose activities, lessons, and games and work in a non-linear fashion
  • Teacher can assign specific lessons to a students, class or specific group

Cons:

  • Students repeat the same lesson twice in the “computer-guided mode”
  • The “self-guided mode” can be overwhelming for students
  • Only four typing games
  • The “self-guided mode” could be more kid-friendly

Here are the additional typing sites that can be “unlocked” by  “levelling up” during lessons. I posted this symbaloo on our Learning Management Software (Blackboard) so they can try them at home. (Each “symbaloo” links to website for students, normally one click takes you there, but click my screenshot below to reach the “clickable” symbaloo page.)

symbaloo keyboarding sample

Recording their progress

I use two resources:

1. a simple wall chart with the student’s name, class and level. They give themselves a checkmark when they level up. Not very private(!) I realise but it is SO useful to easily keep track and monitor their progress during the hustle and bustle of keyboarding lessons in the ICT lab.

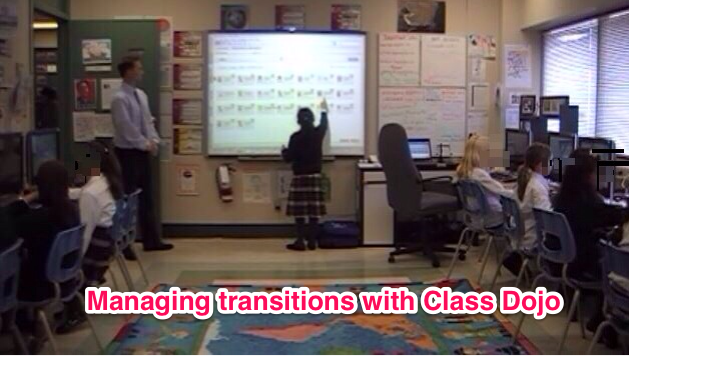
2. During keyboarding lessons, I display a Class Dojo page on the SMARTboard for them to see and reward themselves with a  +1 typing point. When reviewing, assessing and analyzing student progress, I love that Class Dojo records the date of when the point was achieved. What a great tool for reflection and analysis. “Wow, look how you achieved 2 levels in 1 month! All that time practicing in our custom typing site really paid off!”

+1 typing
Overall, the best part is that I am spending more class time celebrating student progress and achievements. A quick thumbs up, nod, high five or encouraging word from me and students seem eager to independently record their progress on a wall chart and on the SMARTboard though Class Dojo.

Conclusions

When setting up my levels, I started with 4 and had to expand to 10 within a couple of months as some of my Grade 4’s progressed quickly! Initially, most students were keen to “level up” to gain more choice of games and activities. This increased motivation made them increasingly receptive to tips and tricks to improve their speed and accuracy. Although I remained open to feedback, l found that students appreciated the clarity of the system. If they came up a little short in their speed, they almost always responded well when encouraged to try again, complete a different activity,  or to return to the typing assessment when ready.

A funny thing happened at the later levels, I was afraid that some of the students might unlock their favourite game (e.g. the popular Type Racer!) play that game regularly and then have their skills stagnate. However, once the majority of the students began to level up they seemed determined to past the assessment benchmarks. It was a complete reversal as I was now the one offering them the opportunity to play a typing game while they were more keen to complete assessments. It seemed that the process of “levelling up” gave them a tangible achievement goal and they were motivated to keep going. (I guess that is why I had to expand my levels from 4 (version 1.0) to 6 (version 2.0) to 10 (latest version 3.0).

Overall, the benchmarks seemed pretty clear and I was able to tweak my requirements to ensure that the difficulties of each level increased at a appropriate rate. Custom Typing,  Mavis Beacon and typingtest.com seemed to be pretty good resources for typing assessments although you should be aware of the ads at the typingtest.com site. (Although students seem to be too focused on their test to see them!) I hope to update and refine this approach each year. Thanks in advance for any feedback.

Questions for further study and analysis

What place does keyboarding have in the 21st Century ICT curriculum?
What age should student start to learn about keyboarding?
Should keyboarding be expanded to include tablets and mobile devices when appropriate?
How much time should we devote to keyboarding in the primary, junior and senior curriculum?
What tools or software do we need to run a successful typing programme?
Should I add/replace customtyping.com or Mavis Beacon with the web-based QWERTYtown software?

3  influencial articles and resources

Lisa Nielsen’s article-  http://theinnovativeeducator.blogspot.ca/2011/02/when-should-students-start-learning-to.html

Bryan Miller’s article tackles one of the questions for further study, introduced me to QWERTYtown and gave me another excellent perspective on this topic. http://edudemic.com/2012/11/keyboarding-or-computer-literacy-the-new-dilemma/

Keith Ferrell’s EdTech blog provided me with keyboarding resources and ideas that I shared with students. http://edtechideas.com/keyboarding-sites-for-kids/

tmtt – A quick summary of Game-Based Learning

Like it or not, digital games loom large in the lives of our 21c kids today. Most of our students and perhaps you too, received some kind of device/game/gadget over the holidays! Happy New Year BTW!) From Minecraft guides on YouTube, to interacting with their virtual pet on a DS to reading(and playing) a Dr. Seuss ebook/game on an IPad /smartphone, our kids use these devices to play, share and learn about the world. (And this is not just how I spent my break!)

GBL is an powerful tool when: used purposely to teach a topic, age appropriate, easy to start but suitably and increasingly challenging and most importantly, fun. For our Grade Four’s, our truck driving simulation called Cross Country Canada 2 is an effective (and sneaky) way to teach them Canadian geography. When keyboarding, our Grade Five students earn levels by improving their skills and when they “level up” they “unlock” new activities and challenges. Like drama and other resources, digital games can be an excellent resource to motivate, differentiate and engage a variety of learning styles and offer experiential learning through well designed games and simulations. I believe that strategically chosen games and educationally rich simulations can be a strong element of a well-rounded curriculum to target this generation.

Here is a good video as an introduction to GBL (ignore the background piano playing as it is only slightly better than mine!) and also included is an excellent comprehensive GBL resource page from Edutopia.
Let me know what you think and please feel free to share any GBL strategies and resources from your lessons. I am happy to share our current GBL resources, collaborate and search for more on your topics.

Here is a link to a prior article on how I “gamified” my ICT lessons.

Also here is a Symbaloo on Keyboarding resources, I created and posted on our LMS (Blackboard).

symbaloo keyboarding sample

*tmtt = Our two minute technology tip shared with our staff.

My top 3 tools for quick collaborative writing in the classroom

Ok, so Microsoft Word is still an excellent and comprehensive tool for individual writing tasks. However, even with features like “track changes” in Word, creating and editing as team still involves some back and forth with email. Google Docs, wikis and blogs are excellent for collaborative writing but set up (i.e. student accounts) is needed. With that in mind, here are three web-based writing tools for creating a quick document in class with multiple authors. No sign up needed and our students authors can simply visit the shared web link to co-write and create.
1. Wallwisher
Create a webpage with one click. Recently updated to allow access from every possible device and includes new options like backgrounds and icons. Visually stunning but can be distracting as we know students love to customize while we’re saying “Get to the text please!”) However, the finished project does look amazing when shared as a link or image.

2. Lino It

Similar to Wallwisher but students can contribute text, picture, link or video as a sticky note. The “corkboard” background extends too. You need to create a teacher account here to share your “web canvas” to students but this one is my favourite because it is simple yet effective. In class, I can post on my Smartboard and then each student adds their a “sticky note” to our digital canvas either at the ‘board or at their computer. With my Grade Four students, I used Lino It to create a stickyboard to support our inquiry and research on Canada. As students progressed in our simulation game called “Cross Country Canada 2” where students, they were invited to add feedback, questions and discoveries to our collaborative document. This stickyboard served as a place to pose and answer questions and wonderings about our topic.
Here is a sample.

3. Primary Pad
http://www.youtube.com/watch?v=emr4snqXDFc&feature=player_embedded
A simple web-based word processing tool where students create a doc and invite co-authors (up to 50!). Works best when one student starts a page and then shares the address with a small group. Each group member is automatically assigned a different colour. One great feature is the time slider so you can see how the writing evolves over time. Awesome for assessing the process as well as the final product.

What I like most about these tools is that each individual, assuming they have a device in front of them, is actively writing and contributing. i.e. a group of 4 is not “crowding around” one computer. All the students have the space to share their thoughts and ideas individually but the software collects them all together. Kind of like our “chart paper” collaborations but each student gets the “marker” at the same time and has access to all the tools and resources of the computer. (i.e. spelling check, neater writing, the web etc…)

2 min. tech. tip – flipsnack is a cool tool to display student work

flips
As a teacher, I find that there is nothing better than sharing projects from students at the end of term or unit. Not only that, students love seeing their work published whether in a book, website or bulletin board.

One tool I love for sharing is called Flipsnack as this site allows you to create a digital flipbook from any .pdf file. You can either scan documents through our printer as a .pdf or create .pdf’s yourself (i.e. in Word save as a .pdf etc.) Their “Flipsnack” creations can then be shared by a URL or embedded in a web site, blog, wiki or LMS (like our blackboard). Also good to note that there is 15 page maximum for each “free” book. However, my work-around is to create two books for each project and display both the links.

Here is an example from a few Grade Three students.

Another example from the flipsnack team.

The other “snack tools” are excellent too. Here are links for photosnack – an online slideshow creator, filesnack – a quick and easy file sharing service and their newest tool: snack websites – for a high quality website creator. All are free and I think are well-designed.

Doing my best so you’re on the cutting edge!

Two min. tech. tip – Introducing Ziggi (great product+great price=great for schools)

ziggi

Having a document camera (like Ziggi) available in the class allows teachers to instantly display materials to everyone using their projector. Whether you want to demonstrate an excellent piece of student writing, a math solution, a science experiment or a diagram from a social studies textbook,  a document camera is a quick and easy way to enhance those teachable moments.

Here is a link to the Canadian supplier of this device.

A list of 50 ways to use a Document Cameras in the classroom: http://www.edtechnetwork.com/document_cameras.html

My Top 3 Social Bookmarking Sites

Surfing the web for resources for your students is great but is pretty time consuming! How do you keep track and remember that awesome site you found for your students 2 weeks ago?! And which computer/device did I use?!

Thankfully, there are a number of web-based tools that can help you select, collect and share great sites on topics important to you and your students. All these below tools are accessible on a number of browsers (Chrome, Internet Explorer, Safari…) and devices (like smartphones or tablets like IPads).

delicious

1. Delicious – An oldie but a goodie that was sorely neglected but recently acquired by the YouTube founders Chad Hurley and Steve Chen so it is more actively support and updated. You can save (and tag) websites so you can visit and access later. I have been using this site for a quite a while and use it often when reading online on the web or (more likely on the IPad with hot beverage at the ready.) Here is a link to my delicious account. Feel free to search through the tags for useful sites. I collect links on this site after browsing through Apps like Zite, HuffPost, TrapIt and the ever popular Flipboard. While reading on IPad, I collect links on my topics of interest for everyday teaching practice or sites to share with colleagues. As for browser support there are a number on Chrome extensions or add-ons for Firefox and Internet Explorer.

diigo

2. Diigo – is similar to Delicious for saving sites with the additional options to highlight and add notes to specific pages.  See this video for more information on getting started.

pinterest

3.  Pinterest – It is impossible to ignore the fastest growing  (and 3rd most popular now) social media site behind Facebook and Twitter. Finding resources is as easy as visiting the site and searching under Education. Many of our kindergarten and primary teachers have accounts (One told me she was the “queen of Pinterest” but I am not saying who) and have been collecting excellent ideas and “Pin” ideas regularly for their classrooms and beyond.

Thanks to everyone for their ideas and advice for this tip and others too. Honourable mention should definitely go to Instapaper too as an excellent app that I use to collect and read articles for specific offline use. Personally, I use Instapaper for a quick and easy and not “internet reliant” way to access articles on detailed instructions on how to do something with a quite a few steps  i.e. A teacher’s guide to using Evernote for portfolios etc.

My top 3 Cloud Storage Apps

If you have ever asked…where IS that file!? Cloud storage sites are an excellent way to store and access your important files on multiple devices like tablets, smartphones  or multiple computers. All provide FREE space and are a perfect alternative to the increasingly unreliable and easily lost USB drives.

My favourites are:

  1. Dropbox: The most popular and user-friendly app; available in the widest variety of apps; storage; great for collaboration and sharing folders with friends and  starts at 2 GB with lots of ways to earn free space
  2. Microsoft SkyDrive: allows you to access your files from any computer; 7 GB of free storage (25GB for Hotmail/MSN users)
  3. Google Drive: Integrates well with Gmail and can display an excellent variety of file types; My favourite for sharing “one-off” files quickly; 5 GB of free storage

All these applications are excellent for sharing files like photos or videos and handy for collaborating on projects with multiple editors and writers. Files and projects can be stored in an online folder rather than having multiple versions emailed back and forth. In all of the above sites, each file becomes a link that is easy to share in messages or posts.

For more information and a pretty comprehensive review of cloud storage options, please feel free to visit the below article.

http://www.theverge.com/2012/4/24/2954960/google-drive-dropbox-skydrive-sugarsync-cloud-storage-competition

Two min. tech. tip #8 – Welcome to the Class Dojo!

We are all familiar with the practice of rewarding students and classes with points for specific behaviours and good practices.

Class Dojo is a free website to aid teachers to record and manage specific learning goals and behaviours to extend this practice further. Students can create their own avatars, check their points at home and their progress is easily displayed on a laptop or SMARTboard or tablet with the app.

Below is a video of a teacher using Class Dojo to start his class. At my school, I am using the same model to start my class in the computer lab and it works really well. (I created my own “tribute” video that I shared internally to help staff see this app in action.)Here is a screen capture of the video.
cd transition pic
I chose Independence (1 of 6 my skills) for the class as an area of development. When each student enters the class they immediately login to the computer and open their project. Then, they reward themselves by going up to the SMARTboard without asking and giving themselves +1 for independence and then returning to their project.

Overall, Class Dojo is an excellent tool to manage transitions especially when students are arriving at different times. It is student-friendly and a measurable record of progress and success in the classroom. I welcome your feedback and let me know if I can help get you started.

More visuals – http://www.digitalplay.info/blog/2011/11/04/reward-or-punishment-gamification-with-class-dojo/

Introduction to class dojo video for students
http://www.youtube.com/watch?v=KaeNSYJvrn0&feature=youtu.be

Two min. Tech. tip #7 – Using Spotlight Tool

Purpose: In a distracting world (and computer screen for that matter) this SMARTnotebook tool allows you to focus student attention on a particular part of the screen or window.

http://www.youtube.com/watch?v=rRibDkd9Nmk

Two min. Tech tip #6 – Customizing your Floating Tools

Purpose: To use floating tools outside of the SMARTnotebook software
http://youtu.be/34dArNAOXaY